Analyze and clean the WinSXS folder

Please note that the commands will only work on Windows 8 or newer machines.

Here is what you need to do to analyze the WinSXS Folder:

  1. Tap on the Windows-key, type cmd.exe, hold down Shift and Ctrl, and hit the enter key on the keyboard. This opens an elevated command prompt on the system.
  2. Run the command dism.exe /Online /Cleanup-Image /AnalyzeComponentStore
  3. ceanup

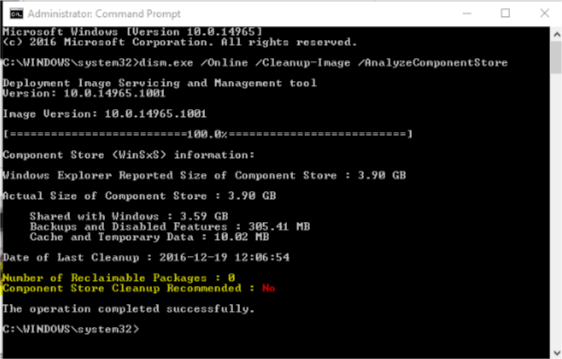
The parameter /Online refers to the current installation, and /Cleanup-Image /AnaylzeComponentStore to analyzing the current component store of that installation (the WinSXS folder).


You can list all available commands using dism.exe /?, and subsequently dism.exe /Online /? and dism.exe /Online /Cleanup-Image /?.

The command runs a scan that takes a moment to complete. It echoes the Windows Explorer size and actual size to the command prompt window, and gives recommendations whether it makes sense to run a cleanup operation.

Cleanup

Windows runs a cleanup regularly using the Task Scheduler. You can check if that is the case on your machine in the following way:

  1. Tap on the Windows-key, type Task Scheduler and hit enter.
  2. Navigate to Task Scheduler (local) > Task Scheduler Library > Microsoft > Windows > Servicing > StartComponentCleanup

You can run the cleanup operation manually at any time using the following command using an elevated command prompt:

dism.exe /Online /Cleanup-Image /StartComponentCleanup

or for more

dism.exe /Online /Cleanup-Image /StartComponentCleanup /ResetBase


For service pack cleanup

dism.exe /Online /Cleanup-Image /spsuperseded /hidesp


How to bypass the “secure connection failed” warning in Firefox

5l9dz

Open Firefox’s and type about:config in address bar

search for security.tls.insecure_fallback_hosts

double click and add the www.domain.com or the local server name (substitute the domain you’re having the problem with)

Reload the page

Windows 10 Edge can’t be opened using the built-in administrator account

edge_admin1a

error Microsoft Edge can’t be opened using the Built-in Administrator account.  Sign in with a different account and try again.

In order to get around this message in your test environment and be able to use your Built-in Administrator account to navigate Edge, follow the following steps to get up and running.

  • Navigate to your local security policy on your Windows 10 workstation – You can do this by typing secpol.msc at a search/run/command prompt.
  • Under Local Policies/Security Options navigate to “User Account Control Admin Approval Mode for the Built-in Administrator account
  • Set the policy to Enabled

edge_admin1


***Updated for Windows 10 Home Users***

For Windows 10 Home users, the local security policy editor doesn’t exist.  However, most of the policy changes that can be made using the policy editor can also be made using the registry.  I have not tested this on a Windows 10 Home system, however, changing this registry key should be the equivalent to enabling the policy above – See the UAC registry guide from Microsoft https://technet.microsoft.com/en-us/library/Dd835564(v=WS.10).aspx#BKMK_BuiltInAdmin.  Navigate to the following registry key:

HKEY_LOCAL_MACHINE\SOFTWARE\Microsoft\Windows\CurrentVersion\Policies\System

  • Create a DWORD value if it doesn’t already exist called FilterAdministratorToken
  • Set the value to 1

Next we need to navigate to the registry and make an additional change:

  • HKEY_LOCAL_MACHINE\SOFTWARE\Microsoft\Windows\CurrentVersion\Policies\System\UIPI\
  • Change the Default string key to 0x00000001(1)Also, in addition to the above, make sure your User Account Control Setting is set to the third level from the bottom.  To get to UAC, go to your Windows 10 search and type uac.  It should come up as “Change User Account Control Settings“.

Finally, restart Windows and then you will be able to enjoy Edge under your Built-in Administrator account.


Can’t remove Hyper-V Backup Checkpoint/Snapshot from VM

Hyper-v 2012R2 uses checkpoints to aid the backup process of VM’s.

These checkpoints are created and deleted by the backup Process, the actual checkpoint can not be deleted using hyper-V manager GUI and will not show up in SCVMM at all.
Why you may ask? Well the reason is simple these checkpoints are actually differencing disks. Thats right the backup process creates a differecing disk, while this is basically the same as a checkpoint it can’t be deleted using any available GUI. It should actually be deleted by the backup Process.

dhcp


Now you may notice that the icon is slighty different from that of a regular checkpoint, that is because this is a differencing disk. Running an inspection of the VHDX file will reveal this.


vhd


In this case a failed backup of the VM left the hindering checkpoint. The only way to deal with it is by using Powershell.

The following command will help you determine that a checkpoint is currently open on the VM:

Get-VMSnapshot -VMName VMNameWithCheckPoint -ComputerName HyperVServerName | fl

this returns the VM state

and his command will remove the checkpoint and merge the AVHDX file into it’s parent VHDX file.

Get-VMSnapshot -VMName VMNameWithCheckPoint -ComputerName HyperVServerName | Remove-VMSnapshot

Hope this helps if you find yourself in a similiar situation.

Slide to Shut Down a Windows 10 PC Like a Windows Phone

When Microsoft first released Windows 8, shutting it down was an annoying experience. However, it did get easier with Windows 8.1, and now there are several options you have now to shutdown, sleep, or hibernate in Windows 10.

Create Shortcut to Slide to Shutdown Windows 10 PCs

If you’re the owner of a Surface Pro, you can hold the power button down for a few seconds to get the slide to power off screen, but this creates a shortcut to do the same thing on a traditional laptop or desktop PC.

It’s just a matter of finding the file that’s hidden deep in the System32 folder. There are a couple of ways to do this. First, you could navigate there by going to C:\Windows\System32 and doing a search for sidletoshutdown.exe. Then send it to the desktop as a shortcut

Or, if you don’t want to navigate through the file system, here’s an easier way to do it. Right-click the desktop and select to create a new shortcut and enter the following path:

%windir%\System32\SlideToShutDown.exe

shortcut


3-name-shortcut


There you go! Now when you tap or click the shortcut, you’ll see the following screen. Swipe it down to power off your PC. If you don’t swipe it down for 10 seconds, it will disappear.

slideshutdown


How to setup BitLocker Encryption on Windows 8 / 8.1 without TPM

BitLocker is a full disk encryption software that comes standard with PCs running Windows 8 Pro or higher.

BitLocker_Logo_e546caa310

This document provides instructions for encrypting the hard drive without Trusted Platform Module (TPM – integrated security chip) present or enabled, and bypasses the USB flash drive encryption key requirement.

  1. From the Metro UI or the search box, type GPEDIT.MSC and press enter
  2. Open Computer Configuration =>
    Administrative Templates =>
    Windows Components =>
    BitLocker Drive Encryption =>
    Operating System Drives. From the right pane double-click “Require additional authentication at startup” and select “Enabled” and apply it. then run “gpupdate” from a command line.

Now you can enable Bitlocker without TPM


How to install windows 8 in a UEFI environment with Secure boot enabled

UEFI-Boot

If you want to install a clean copy of Windows 8 or Windows 8.1 on a UEFI enabled computer, you will need a UEFI bootable USB flash drive to start with. This is a tutorial to show you how to make such flash drive with and without the help of 3rd party tool.

The manual process

1. Connect the USB flash drive to your computer, of course.

2. Open Command Prompt with Admin rights. Press Win+X and choose Command Prompt (Admin) from the list.

3. Type diskpart to start the diskpart built-in utility. And type list disk and make the note of the disk # for the USB drive.

4. Type in the following command to properly format the flash drive. Replace # with the actual # you got from step 3 above.

select disk #
clean
create partition primary
format fs=fat32 quick
active
assign
exit

5. Now close the Command Prompt window, and open File Explorer, browser through to the location where saves the Windows 8 installation ISO image file.

6. Mount ISO file by right-clicking the ISO file and choosing Mount. If you don’t see Mount command from the context menu, go to Open With → Windows Explorer instead.

7. Select everything in the ISO file, and copy them into the formatted USB flash drive you prepared earlier

8. One more extra step if you are preparing for a 64-bit version of installation. You will need to copy a file called bootmgfw.efi from inside install.wim file at sources folder to efi\boot folder on USB flash drive, and rename it to bootx64.efi. Sounds tedious, isn’t it? So let’s put an easy way, you can simply download this file (direct download link) and copy to your efi\boot folder.

That’s it. Now, you can boot off from this USB flash drive and start the fresh clean installation.


Windows 8 installation ISO now available for download without license key

please visit

http://windows.microsoft.com/en-us/windows-8/create-reset-refresh-media

Quickly Launch Command Prompt as an Administrator with a Keyboard Shortcut

Normally, you could launch Command Prompt with default privileges by simply clicking on it in the search results list, or highlighting it with the keyboard and pressing Enter. Alternatively, you could launch Command Prompt as an administrator by right-clicking on it in the search results and selecting Run as Administrator.

But for the fastest experience, highlight the Command Prompt result in the Windows search bar and press Control-Shift-Enter. Doing so will automatically launch Command Prompt with elevated administrative privileges, and you’ll see the User Account Control (UAC) prompt appear immediately as a result.


How to Switch from the Start Menu to the Start Screen in Windows 10

To switch from the Start Menu to the Start Screen in Windows 10, head to your Windows Desktop, right-click on the Taskbar, and choose Properties. In the Taskbar and Start Menu Properties window, navigate to the Start Menu tab and find the checkbox titled “Use the Start menu instead of the Start screen.” As you can guess from its description, uncheck this box to restore the Windows 8-style Start Screen interface in Windows 10.


Click OK to accept the change and close the window. Switching from the Start Menu to the Start Screen in Windows 10 requires the user to sign out before the change will take effect. A dialog box will appear to notify you of this. If your work is saved and you’re ready to sign out, click Sign out and change settings to complete the process.

Powered by WordPress and Bootstrap4