October 2nd, 2009
  neyomax
 How can I set up Microsoft IIS as an ESET update Mirror server?
KB Solution ID: SOLN2270|Last Revised: July 24, 2009
After you have created a Mirror server and configured clients to access the Mirror server for updates, you can set the Microsoft Internet Information Services (IIS) to act as the mirror server. To learn more about Mirror servers and their functionality, click here. To use Microsoft Internet Information Services (IIS) as an ESET update mirror server, follow the steps below:
Warning: If your ESET Remote Administrator Server (ERAS) is also a web server that is already hosting websites through IIS, move ERAS to another server and do not proceed with the following steps. The settings configured in the steps below may interfere with your existing websites.
Important! The following procedures use Microsoft Windows Server 2003 and Microsoft IIS Manager 6.0. Specific steps may vary slightly on other operating systems or with different versions of Microsoft IIS Manager.
- Open the ESET Remote Administrator Console (ERAC) by clicking Start → All Programs → ESET → ESET Remote Administrator Console → ESET Remote Administrator Console.
- Click Tools → Server Options → Updates. Deselect the Provide update files via internal HTTP server option. Click OK.
- Open IIS Manager by clicking Start → All Programs → Administrative Tools → Internet Information Services (IIS) Manager.
- Click the + next to your server name to expand the menu tree. Right-click Web sites and select New → Web site from the context menu to open the Web Site Creation Wizard. Click Next in the first screen of the Web Site Creation Wizard to begin.
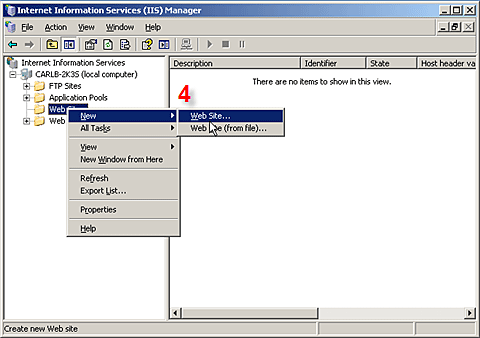
Fig. 1-1
- Enter a name for the website in the Description field. For example: ESET mirror. Click Next.
- Leave the Enter the IP address to use for this Web site field at its default setting: (All Unassigned). Enter 2221 in the TCP port this Web site should use field (default is 80). Leave the Host header for this Web site field empty. Click Next.

Fig. 1-2
- Click the Browse button and browse to the mirror folder by following the path below:
C:\Documents and Settings\All Users\Application Data\ESET\ESET Remote Administrator\Server\Mirror
NOTE: The path above is the default location for the Mirror folder.
Select the Allow anonymous access to this Web site option. Click Next.
- Select the Read check box from the list of access permissions. Click Next and then Finish to complete and exit the Web Site Creation Wizard.
- ESET Mirror should now be listed under Web Sites in the IIS Manager menu tree, with the contents of the mirror folder displayed in the primary window. Right-click ESET Mirror from the menu tree and select Properties from the context menu.
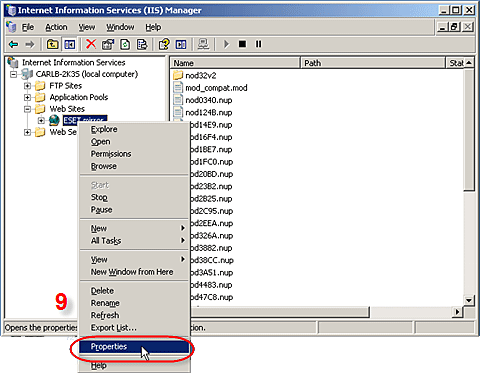
Fig. 1-3
- On the Web Site tab, check that the TCP port field is set to 2221 and the SSL port field is blank.
- Click the HTTP Headers tab and then click the MIME Types… button.
- In the MIME Types window, click New…. In the pop-up MIME Type window, enter * in the Extension field and then enter application/octet-stream in the MIME type field. Click OK in each window.
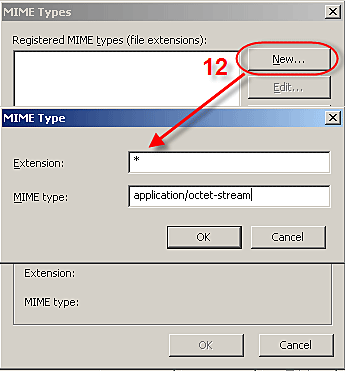
Fig. 1-4
- Click the Documents tab and deselect Enable default content page. Click OK to return to IIS Manager.
- Close IIS Manager. Open a web browser and enter the following URL:
http://servername:2221/update.ver
Important! In the above URL, servername should be replaced with the server name.
If there are no errors, your web browser will display a text file with update information.
- Test the newly configured mirror server by directing an ESET client workstation (running ESET Smart Security or ESET NOD32 Antivirus) to update from http://servername:2221/update.ver and check its connection.
 Posted in