All posts by Kapuwa

Uninstallers (removal tools) for common antivirus software

antivirus

Running two antivirus products on the same computer can cause system instability and degraded performance. It is important that any previously installed antivirus software is uninstalled from your system before installing your ESET security product.

For your convenience, as typical uninstallation using the Windows removal tool (Add/Remove Programs) is often insufficient,  removal tools* for common antivirus programs can be downloaded by following the links below.

  1. Click the link associated with the antivirus software currently installed on your system and follow the prompts or instructions on the website.
     
  2. After uninstallation is complete, you will need to restart your computer. You may then proceed with installing your ESET security product.

ESET

http://kb.eset.com/esetkb/index?page=content&id=SOLN2289&actp=search&viewlocale=en_US&searchid=1250477370884

Avast:
http://files.avast.com/files/eng/aswclear.exe

AVG:
www.avg.com/download-tools 

BitDefender:
http://kb.bitdefender.com/KB333-en–How-to-uninstall-BitDefender.html

CA:
http://homeofficekb.ca.com/CIDocument.asp?KDId=3125&Preview=0&Return=0&GUID=DF325E0AA0AB4264AF47E4BEA49F571B

F-Secure:
http://support.f-secure.com/enu/corporate/downloads/removeav.shtml

Kaspersky:
http://usa.kaspersky.com/support/home-support.php?selected_faq_id=193239348&selected_product_id=176492845&selected_topic_id=176492916

McAfee:
http://download.mcafee.com/products/licensed/cust_support_patches/MCPR.exe

Panda:
http://www.pandasecurity.com/resources/sop/UNINSTALLER_08.exe

Symantec (Norton):
http://solutions.symantec.com/sdccommon/asp/symcu…


Trend Micro:

http://esupport.trendmicro.com/support/viewxml.do?ContentID=EN-1033129

Clear the Auto-Complete Email Address Cache in Outlook.com

outlook

Outlook 2003 has an automatic completion for any email address that you try to type into the To or CC fields. This feature does not pull from the contacts or address book, because you may have tried to email somebody that wasn’t in your contact list, and it will still add that to the auto complete list.

The problem comes in when you put in a bad address, and then every time you go to type in the email address, the incorrect one appears in the auto complete list.

To fix this problem, there are two ways around this. The easiest way is this:

  • Start typing in the address that shows up incorrectly.
  • Hit the Down arrow key to select the auto completed address.
  • Hit the Delete key to delete the auto complete address

The other way is by opening the profile folder and deleting the .nk2 file.

  • Open up windows explorer, and paste the following into the address bar: %APPDATA%\Microsoft\Outlook
  • Delete the Outlook.NK2 file that you find in this folder.

Uninstalling ITM 8.1 (silently) using a command line or script.

ca

Title:  Uninstalling ITM 8.1 (silently) using a command line or script.


Description:CA Integrated Threat Management (ITM) 8.1 can be interactively uninstalled from Add/Remove programs.

However, there may be cases where there’s a need to perform the un-install from a command prompt or through a script silently.

Solution:

  1. In order to uninstall the ITM Server, the following command must be executed from the command prompt:MsiExec.exe /X{279B9433-D04B-4BD1-B7A3-C3FA42291979}


  2. In order to uninstall the ITM Agent, the following command must be executed from the command prompt:MsiExec.exe /X{107558C8-458B-45EA-A0FE-7CC10D687DB6}


  3. In order to uninstall iTechnology iGateway, the following command must be executed from the command prompt:MsiExec.exe /X{847501DF-07C0-4691-B04A-893929F108AE}

    NOTE:
    If there are more CA products installed on the same machine, please make sure that the iTechnology iGateway component is not being used by any of those products. In case of any doubt, please do on hesitate to contact the Technical Support team.

For a silent uninstall (without any user interaction/intervention), add the switch “/qn” as a parameter to the command-line.

Example of a silent uninstall command for ITM Server:

MsiExec.exe /qn /X{279B9433-D04B-4BD1-B7A3-C3FA42291979}

Windows 7 system requirements

windows722If you want to run Windows 7 on your PC, here’s what it takes:

  • 1 gigahertz (GHz) or faster 32-bit (x86) or 64-bit (x64) processor
  • 1 gigabyte (GB) RAM (32-bit) or 2 GB RAM (64-bit)
  • 16 GB available hard disk space (32-bit) or 20 GB (64-bit)
  • DirectX 9 graphics device with WDDM 1.0 or higher driver

Additional requirements to use certain features:

  • Internet access (fees may apply)
  • Depending on resolution, video playback may require additional memory and advanced graphics hardware
  • For some Windows Media Center functionality a TV tuner and additional hardware may be required
  • Windows Touch and Tablet PCs require specific hardware
  • HomeGroup requires a network and PCs running Windows 7
  • DVD/CD authoring requires a compatible optical drive
  • BitLocker requires Trusted Platform Module (TPM) 1.2
  • BitLocker To Go requires a USB flash drive
  • Windows XP Mode requires an additional 1 GB of RAM, an additional 15 GB of available hard disk space, and a processor capable of hardware virtualization with Intel VT or AMD-V turned on
  • Music and sound require audio output

Product functionality and graphics may vary based on your system configuration. Some features may require advanced or additional hardware.


Before you begin

Before you run the Windows 7 Upgrade Advisor Beta, be sure to plug in any USB devices or other devices such as printers, external hard drives, or scanners that are regularly used with the PC you’re evaluating.

Before you begin

Before you run the Windows 7 Upgrade Advisor Beta, be sure to plug in any USB devices or other devices such as printers, external hard drives, or scanners that are regularly used with the PC you’re evaluating.

Download the Windows 7 Upgrade Advisor Beta

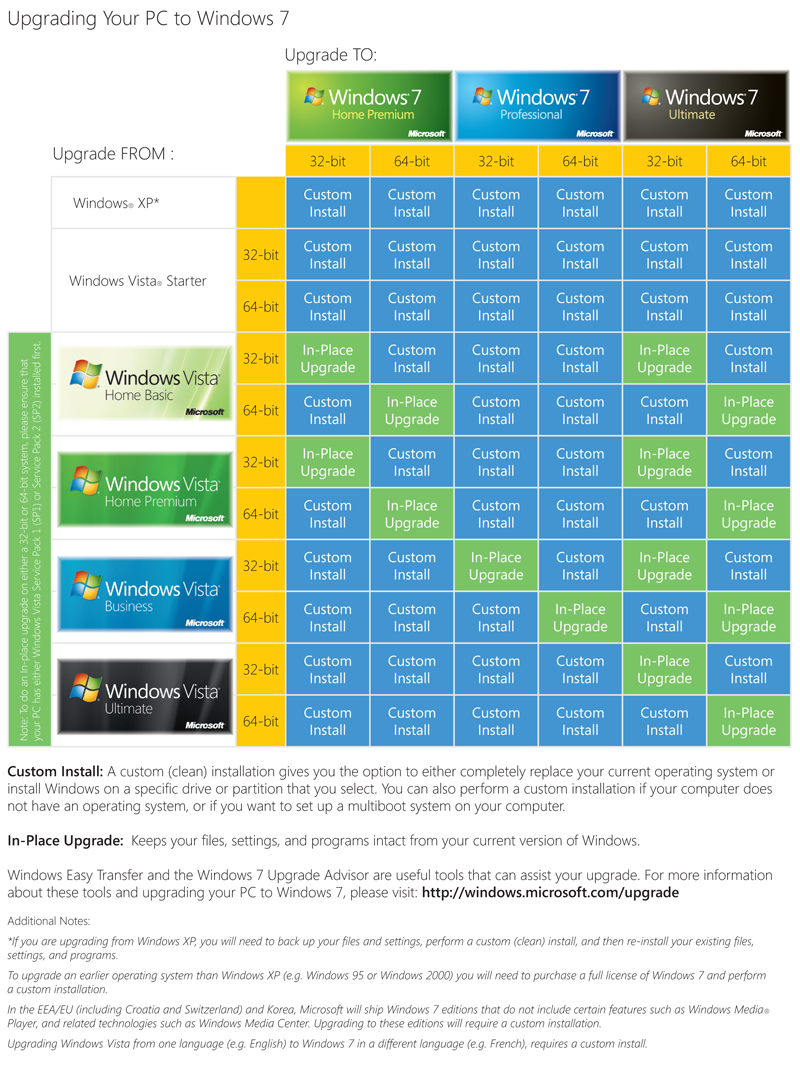
Upgrade of Windows 7 Beta to RC and RTM

windows_upgrade

If you are running Windows 7 Beta and you try to upgrade to Windows 7 RC straight from the installation media, you’ll get an error telling you that this is not possible. Similarly, if you are trying to upgrade from Windows 7 Beta or RC to Windows 7 RTM, you’ll get a similar message.

The upgrade is possible. You just have to do a bit of mucking around. To perform the upgrade, do the following:

  1. Copy the contents of the ISO or DVD to a separate storage location (such as a bootable USB storage device, a separate partition or whatever)
  2. Open the file \sources\cversion.ini in a text editor and modify the MinClient number to a number lower than the version Windows 7 that you want to upgrade from – so for the beta you would set this to something like 6900.
  3. Save the file and then run the install routine from the location with the modified file

How to force windows updates with wuauclt.exe

202px-Windows_update_icon

In order to use WSUS the PC needs to be in Active Directory. Once the PC is in Active directory you can run:

wuauclt.exe /detectnow

This will force the PC to talk to WSUS to get the updates needed instead of waiting for the PC to talk to WSUS.

To view the log go to c:\windows\WindowsUpdate.log or Windows Update.log
In the log you can view any updates the PC may need if any at all.

If you are having issues getting wsus updates try:

wuauclt.exe /resetauthorization /detectnow

This will force the PC to download a new certificate, and then download the updates from WSUS. Again check the log in c:\windows\WindowsUpdate.log to see if the Pc was able to reauthorize and obtain new updates.

Windows Vista could not detect a dial-up modem

The warning message is “windows could not detect a dial-up”

Make Sure following serverices are up and running

STEP – 01

Remote Procedure Call (RPC)
Remote Procedure Call locator (RPC) (Normally this is not started.Make sure this service is in working state)Remote Access Connection Manager
Remote Access Auto Connection Manager (Normally this is not started.Make sure this service is in working state)

STEP – 02

Try those commands

1.Start – run – sc.exe config RasMan depend= “”
2.Start – run – sc config RasMan depend= TapiSrv

Still no luck ??

STEP – 03

Deleted EAP in using regedit on HKEY_LOCAL_MACHINE\SYSTEM\CurrentControlSet\Services\RasMan\PPP\EAP

No luck?

STEP 04

Try Microsoft Remote Access Connections Repir tool

https://kapothi.com/wp-content/uploads/2009/08/rarepair.exe

Hope it will fix ur problem.