All posts by Kapuwa
Open IE’s Private Browsing Mode the Easy Way
Internet Explorer’s “private browsing” mode is an excellent way to hide what you’re looking at from prying eyes, but it’s normally hidden under a menu… but we can make it easier to access.
The Normal Way
To open an InPrivate Browsing window, you can either use the Ctrl+Shift+P shortcut key, or just use the Safety \ InPrivate Browsing item on the menu.

And you’ll immediately see a private browsing window, which will leave no traces of your browsing history. Useful!

The other thing that private browsing is useful for is checking your email on somebody else’s computer – no danger of cookies lying around letting them back into your email account once you’ve gone.
Windows 7 Makes it Really Simple
If you are using Windows 7, all you have to do is right-click on the icon in the taskbar and choose the InPrivate option. You can also click and hold the left mouse button on the icon, and slide your mouse up… the menu will pop up and you can choose it there.

In other news, Windows 7 is really, really slick. If you haven’t already, check out our coverage of the beta release.
Create a Shortcut to Open Private Browsing Mode
If you haven’t made the switch to Windows 7 yet, you can still create your own shortcut manually. Simply create a new shortcut to Internet Explorer, and add the following to the end (after the quotes).
-private
The final path should look similar to this, depending on your system:

Give the icon a useful name indicating that it’s a private mode shortcut…

And now you have a shiny new icon to start up Internet Explorer in private browsing mode.
Work Faster with new Windows 7 Short cuts keys
Windows 7 beta 1 includes some handy new shortcut key combinations that allow you to navigate and manage the Windows workspace more efficiently. Here are 10 new Windows 7 shortcuts that will help you speed up your workflow (“Win” means the Windows Key):
Win+Home: Clear all but the active window
Win+Space: All windows become transparent so you can see through to the desktop
Win+Up arrow: Maximize the active window
Win+Down arrow: Minimize the active window or restore the window if it’s maximized
Win+Left/Right arrows: Dock the active window to each side of the monitor
Win+Shift+Left/Right arrows: If you’ve got dual monitors, this will move the active window to the adjacent monitor
Win+T: Shift focus to and scroll through items on the taskbar
Win+P: Adjust presentation settings for your display
Win+(+/-): Zoom in/out
Shift+Click a taskbar item: Open a new instance of that particular application
Windows 7 System Maintenance Tool
With Windows 7 Microsoft introduces a system maintenance tool. You are curious what it is doing, right?
It checks for:
– Broken shortcuts
– Unused desktop icons
Update:
– Troubleshooting history / Error reports taking up disk space
– System Timecorrection
– Disk Volume errors
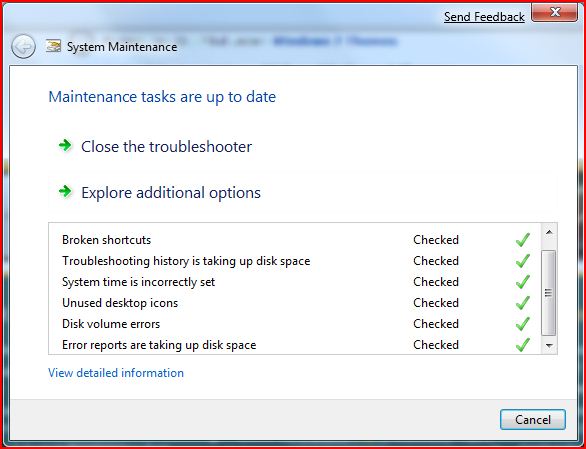
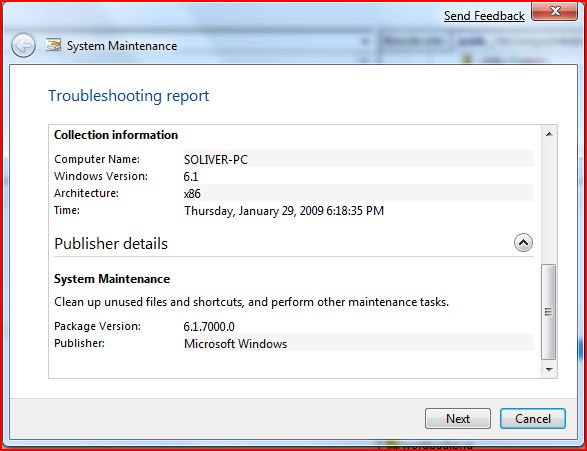
And also collects system information:
Random Info: I took both screens with the new Windows 7 snipping tool, which will increase your productivity a lot. What I don’t like about it is the red border and it saves the file extension in uppercase-letters if you do not type them in.
Anyway, I think Microsoft should deliver all the tools we know from TuneUpUtilites. I do not want to buy additional software to do all the tweaks that are hidden in the registry.
They should include:
– Optimize performance / disable certain graphic elements
– Registry cleaner
– Cookie / Temp cleaner
– Clear History / Favorites / etc
– Advanced Defrag
What else would you like in there if you could change the system maintenance tool ?
Update:
This is the latest system maintenance tool:

Find All Locked Out Accounts
Use Saved Queries to quickly locate all locked out user accounts.
You can use the Saved Queries feature of Windows Server 2003 to query Active Directory for any locked-out accounts. Just open the Active Directory Users and Computers console, right-click on Saved Queries in the console tree and select New –> Query. Type a name and description for the query, specify a query root (where in your namespace your query begins searching), and click the Define Query button. Since there’s no default option for finding locked-out accounts in the Common Queries box, select Custom Search instead to open the Find Custom Search box. Then select the Advanced tab and enter the following LDAP string in the Enter LDAP Query textbox:
(&(&(&(objectCategory=person)(objectClass=user)(lockoutTime:1.2.840.113556.1.4.804:=4294967295))))
Click OK twice to create and run the saved query.
The string works on Windows Server 2003 SP1.
Update: Here’s another LDAP query that finds all locked out accounts:
(&(objectCategory=Person)(objectClass=User)(lockoutTime>=1))
BitLocker To Go Encrypts Portable Flash Drives in Windows 7
The BitLocker feature was introduced in Windows Vista and allowed you to encrypt the content of your hard drive. Now in Windows 7 they offer BitLocker To Go which allows you to encrypt portable USB flash drives.
First open up My Computer and Right-click on the flash drive you want to encrypt and select Turn on BitLocker.

After BitLocker initialized the flash drive you will need to enter in a password to unlock the drive. You can also set up a Smartcard which are usually used in a work environment so talk to you IT staff.

Next you will be prompted to store the recovery key which is used in the event you lose your password or smartcard. If you store it as a file make sure that it is not on the same drive that you’re encrypting.

After the key has been saved as a file or printed you will see a confirmation message.

Finally you will be ready to start encrypting the drive so just click the Start Encrypting button.

While it is encrypting there will be a progress screen displayed.

A successful encryption of the USB flash drive. notice that the drive icon will change to show its encrypted with BitLocker.

Notice that the drive icon will change to show its encrypted with BitLocker where the gold lock indicates it is locked up and the gray lock is displayed after you have unlocked it.

Right-click on that icon to bring up options to manage BitLocker encryption.

The next time you plug in the drive to a Windows 7 machine you will be prompted to enter the password to gain access to the drive. You can also always have it unlocked on specific machines in the future.

You can also use the encrypted drive in Vista and XP. Here we will look at how it looks in XP, when you plug it in you will be prompted for the password to launch BitLocker To Go Reader (the utility is installed automatically on the drive by Windows 7).

BitLocker To Go Reader is a Windows Explorer type navigation utility for showing the content of the drive.

With a BitLocker encrypted drive you will only be able to read and copy files. If you need to add files or change them you will need to use a Windows 7 machine.

This is a great way to easily make sure sensitive data on your USB flash drive is safe. Right now anyone who has Windows 7 RC1 Ultimate can use this feature.
Disable/Enable Click Sound in Internet Explorer (IE) for Windows XP/Server 2003/Vista
If you want to disable the click sound in Internet Explorer found in Microsoft Windows XP, Windows Server 2003 or Windows Vista, then follow these steps:
- Open the Start Menu / Settings / Control Panel
- Double click on the “Sounds” control panel. In this control panel, Scroll down in the events window until you reach “Windows Explorer” and under this you will find “Start Navigation“.
- Click on “Start Navigation” and you will see a .wav file appear in the “Name:” box. This is the sound that is associated with the click sound.
- In the “Name:” drop down menu, select (None) and then hit “OK“. This will set no sound to be played when you’re navigating on the web.
Keep in mind that this will remove the click sound from hitting buttons and links on all web sites you visit until you set it back. This is a safe change to make and does not affect any other functionality of your Windows Explorer browser.
Conclusion
In this article we have shown easy ways on how to disable the click sound in Internet Explorer and Windows Explorer found in Windows 95, Windows 98, Windows 2000, Windows XP, Windows Server 2003 and Windows Vista. The changes are made using the Control Panel and don’t require any messy registry changes.
Disable Aero Shake in Windows 7
One of the interesting new features in Windows 7 is the way you can grab a window by the title bar and “shake” it back and forth to minimize everything else. It’s a fun feature, but just in case you want to disable it we’ve got the solution for you.
Disable Aero Shake Manual Registry Hack
Open up regedit.exe through the start menu search or run box, and then navigate down to the following key:
HKEY_CURRENT_USER\Software\Policies\Microsoft\Windows
Once you are there, right-click on the Windows key and create a new key called Explorer.

Now right-click on the right-hand side, create a new 32-bit DWORD with the following settings:
- Name: NoWindowMinimizingShortcuts
- Value: 1

Once you’ve created this, you should log off and back on for the change to take effect.
Downloadable Registry Hack
Simply download, extract, and double-click on DisableAeroShake.reg to enter the information into the registry. To re-enable use the other file.
Wheres High Performance power plan in Windows 7 RC1?
Yeh you cant see it once you click on battery icon on task bar.
click on battery icon and select “more power options”
click on Down arrow next to category “Show Additional Plans” there you will get the “High Performance” power plan
After upgrade from Vista to Windows 7 missing All Programs and Start menu icons
Looks like there is a 70 menu items limit in windows 7 Rc1
move programs from
C:\ProgramData\Microsoft\Windows\Start Menu\Programs
to a another subfolder& keep less than 70 programs @ root level.