Purpose: To document the full ritual of integrating Hikvision iVMS-4200 with SQL Server, ensuring future resilience and communal clarity.
🔧 Phase 1: SQL Server Preparation
1. Enable TCP/IP and Port 1433
- Open SQL Server Configuration Manager
- Navigate to SQL Server Network Configuration → Protocols for MSSQLSERVER
- Right-click TCP/IP → Enable
- Double-click TCP/IP → go to IP Addresses tab
- Scroll to IPAll section → set
TCP Port = 1433 - Click OK and restart the SQL Server service
Verify SQL Server is listening on the correct port:
SQL
SELECT local_net_address, local_tcp_port
FROM sys.dm_exec_connections
WHERE local_tcp_port IS NOT NULL;
2. Enable Mixed Mode Authentication
- Open SQL Server Management Studio
- Right-click your server name → Properties
- Go to Security tab
- Select SQL Server and Windows Authentication mode
- Click OK and restart the SQL Server service
Confirm Mixed Mode is active:
SQL
EXEC xp_instance_regread
  N'HKEY_LOCAL_MACHINE',
  N'Software\Microsoft\MSSQLServer\MSSQLServer',
  N'LoginMode';
If the result is 2, Mixed Mode is enabled ✅
3. Test Manual Connection
CMD
sqlcmd -S 192.168.1.10,1433 -U sa -P [PASSWORD]🔥 Phase 2: Windows Firewall Verification
Create a firewall rule to allow SQL Server traffic:
PowerShell
New-NetFirewallRule -DisplayName "SQL Server 1433 Inbound" -Direction Inbound -Protocol TCP -LocalPort 1433 -Action Allow🧠 What This Command Does
- Creates a new rule named
SQL Server 1433 Inbound - Direction: Inbound — allows incoming traffic
- Protocol: TCP — used by SQL Server
- LocalPort: 1433 — the default SQL Server port
- Action: Allow — permits traffic through the firewall
🧱 Phase 3: Table Schema Alignment
Step 1: Create the Database
SQL
CREATE DATABASE Attendance;Step 2: Switch to the Database
SQL
USE Attendance;Step 3: Create the Table
SQL
CREATE TABLE TimeAttendance (
  ATTENDANCE_id INT,
  ATTENDANCE_date_time DATETIME,
  ATTENDANCE_date DATE,
  ATTENDANCE_time TIME,
  ATTENDANCE_direction NVARCHAR(10),
  ATTENDANCE_device NVARCHAR(50),
  ATTENDANCE_serial NVARCHAR(50),
  ATTENDANCE_name NVARCHAR(100),
  ATTENDANCE_card NVARCHAR(50)
);
Step 4: Verify Field Names
SQL
SELECT COLUMN_NAME FROM INFORMATION_SCHEMA.COLUMNS
WHERE TABLE_NAME = 'TimeAttendance';
🧪 Optional Verification Query: Confirming sa Access
To verify that the built-in sa login is mapped to the database:
SQL
SELECT name, type_desc
FROM sys.database_principals
WHERE name = 'sa';
If this query returns a row, sa is explicitly mapped. If not, it still has full access via sysadmin role unless denied.
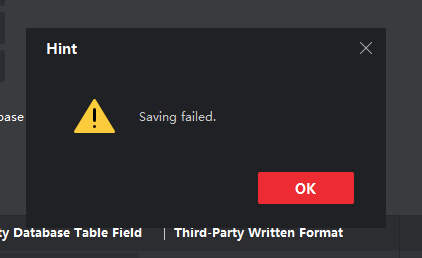
🧪 Phase 4: Profiler-Based Validation
- Launch SQL Server Profiler
- Filter by
LoginName = saandDatabaseName = Attendance - Click Save in iVMS-4200
- If no activity: internal block
If activity appears: SQL handshake confirmed ✅
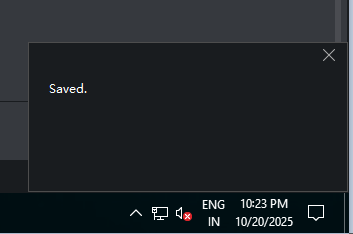
🔄 Phase 5: Console Reset
- Exit iVMS-5200 Service Management from system tray
- Open Hikvision Watchdog and restart all services
- Close and reopen iVMS-4200 Client
- Create a new Third-Party DB profile
- Use updated IP:
192.168.1.10 - Click Save — success message appears 🎉
🧠 Optional Enhancements
- Install SQL Server Native Client
- Monitor inserts with triggers or logs
- Begin device-level sync once console config is validated