“Do people in the U.S. choose to buy Starlink instead of using their existing home internet services, or do most stick with what they already have because it’s fast and reliable enough? Is Starlink mainly popular among those living in remote or underserved areas?”
That’s an insightful question and gets to the core of Starlink’s business model and target market in a place like the United States.
You are correct: the vast majority of people in the USA who buy Starlink are those in rural or remote areas where traditional internet options are either non-existent or extremely poor.
Here’s why Starlink isn’t a widespread competitor to fiber and cable internet in urban and suburban areas:
Steps For Regaining Access to Windows PCs, AWS & Azure
Qualys Assurance No Impact on Our Services
On Friday, July 19, 2024, morning, reports surfaced globally of Microsoft Windows operating system users encountering the infamous Blue Screen of Death (BSOD) following the latest update from CrowdStrike. This widespread issue has severely impacted critical services, including telecommunications, banking, airline and railway operations, supermarkets, hospitals, and major news networks.
Steps For Regaining Access to Windows PCs, AWS & Azure
CrowdStrike has outlined a four-step process for regaining access to Windows PCs affected by the update:
Boot Windows into Safe Mode or the Windows Recovery Environment.
Navigate to the C:\Windows\System32\drivers\CrowdStrike directory.
Locate and delete the file matching “C-00000291*.sys”.
Boot the host normally.
For cloud environments, customers can revert to a snapshot taken before 4:09 am UTC.
For AWS (Amazon Web Services), follow these steps:
Detach the EBS volume from the impacted EC2 instance.
Attach the EBS volume to a new EC2 instance.
Fix the CrowdStrike driver folder.
Detach the EBS volume from the new EC2 instance.
Attach the EBS volume back to the impacted EC2 instance.
For Azure, follow these steps:
Log in to the Azure console.
Go to Virtual Machines and select the affected VM.
In the upper left of the console, click “Connect”.
Click “More ways to Connect” and then select “Serial Console”.
Once SAC has loaded, type in ‘cmd’ and press Enter.
Type ‘ch -si 1’ and press the space bar.
Enter Administrator credentials.
Type the following commands:
‘bcdedit /set {current} safeboot minimal’
‘bcdedit /set {current} safeboot network’
Restart the VM.
To confirm the boot state, run the command: ‘wmic COMPUTERSYSTEM GET BootupState’.
The manual nature of this fix poses a significant challenge for companies, especially those without backups for all VDIs, potentially slowing down the recovery process. Customers will also need a recovery key to access Safe Mode if Bitlocker is enabled on the system disk.
CrowdStrike Engineering has reversed the changes causing this issue, with the error code displayed on affected systems: “Tech-Alert-Windows-crashes-related-to-Falcon-Sensor-2024-07-19.“
Source | Microsoft https://support.microsoft.com/en-us/topic/kb5034439-windows-recovery-environment-update-for-windows-server-2022-january-9-2024-6f9d26e6-784c-4503-a3c6-0beedda443ca
This update automatically applies Safe OS Dynamic Update (KB5034235) to the Windows Recovery Environment (WinRE) on a running PC to address a security vulnerability that could allow attackers to bypass BitLocker encryption by using WinRE. For more information, see CVE-2024-20666.
NOTE If your running PC does not have a WinRE recovery partition, you do not need this update. To verify if you have WinRE enabled, you can run the following command in an elevated command prompt: reagentc /info
If WinRE is enabled you will see Windows RE status in the output with a value of Enabled.
IMPORTANT This update requires 250 MB of free space in the recovery partition to install successfully. If the recovery partition does not have sufficient free space, this update will fail. In this case, you will receive the following error message: 0x80070643 – ERROR_INSTALL_FAILURE To avoid this error or recover from this failure, please follow the Instructions to manually resize your partition to install the WinRE update and then try installing this update. Or, to use a sample script to increase the size of the WinRE recovery partition, see Extend the Windows RE Partition.
The above commands help you to determine the most useful information about the RAM installed on your computer. However, there is another command you can use to query all the available details at the same time.
To view all the memory details on Windows 10/11, then use these steps:
Open Start.
Type Command Prompt, right-click the top result, and select the Run as administrator option.
Type the following command to list every memory detail possible and press Enter wmic memorychip list full
Confirm the available information for each memory module installed on the device.
(Optional) Type the following command to view only the specific details and press Enter wmic memorychip get devicelocator, manufacturer, partnumber, serialnumber, capacity, speed, memorytype, formfactor
This tutorial on how to block a program in a firewall applies to computers running Microsoft Windows 11 operating system. Some details might vary slightly for Windows 10 or older versions, but the procedure is essentially the same.
1. Open the Settings for Windows Defender Firewall with Advanced Security
Use one of the following methods to open the Windows Defender Firewall with Advanced Security.
Method 1
Press the Windows key and the R key at the same type to open the Run dialog box.
Type “WF.msc” into the box.
Hit the “OK” button or Enter.
Method 2
Press the Windows key to open the search function.
Start typing “Windows Defender Firewall” and select the application when it appears.
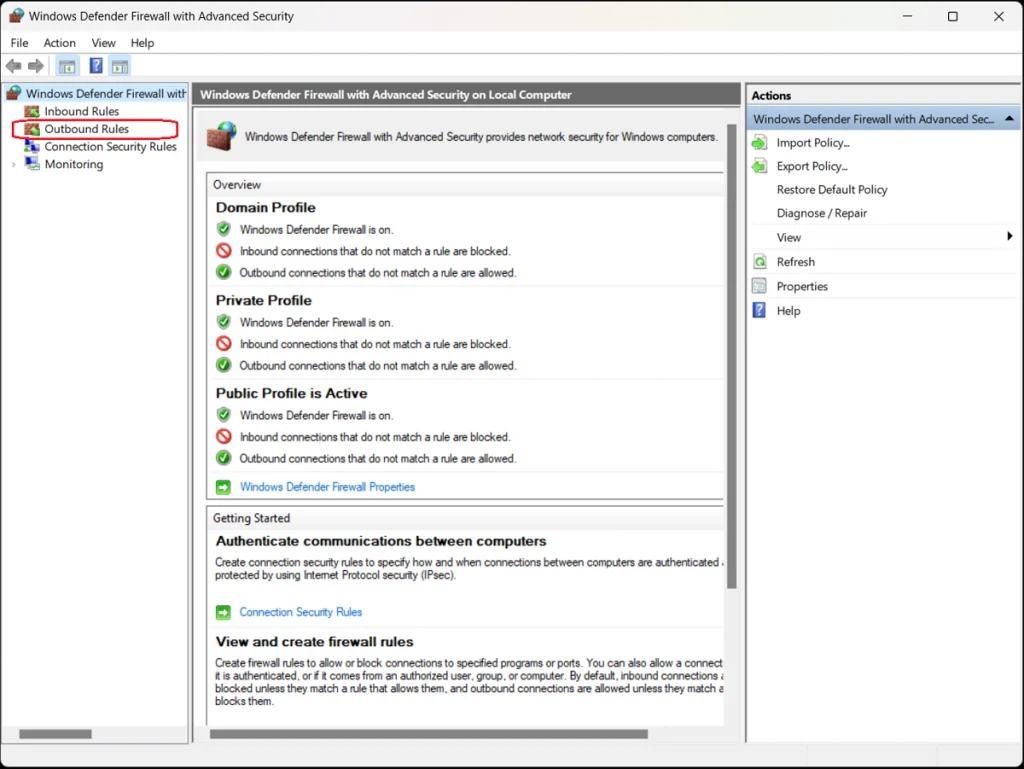
From the Windows Defender Firewall screen, select Advanced Settings in the left sidebar.
2. Select Inbound Rules or Outbound Rules
Choose whether you want to set an inbound rule allowing access to your computer for an external application or program, or an outbound rule allowing an application or program installed on your computer external access through the firewall.
The program-blocking process is similar for both types of rules—for this example, we’ll choose Outbound Rules to block a program in the firewall.
Select the appropriate option from the left sidebar of the Windows Defender Firewall with Advanced Security screen. A list of outbound rules appears detailing their names, groups, profiles, and status (enabled/disabled).
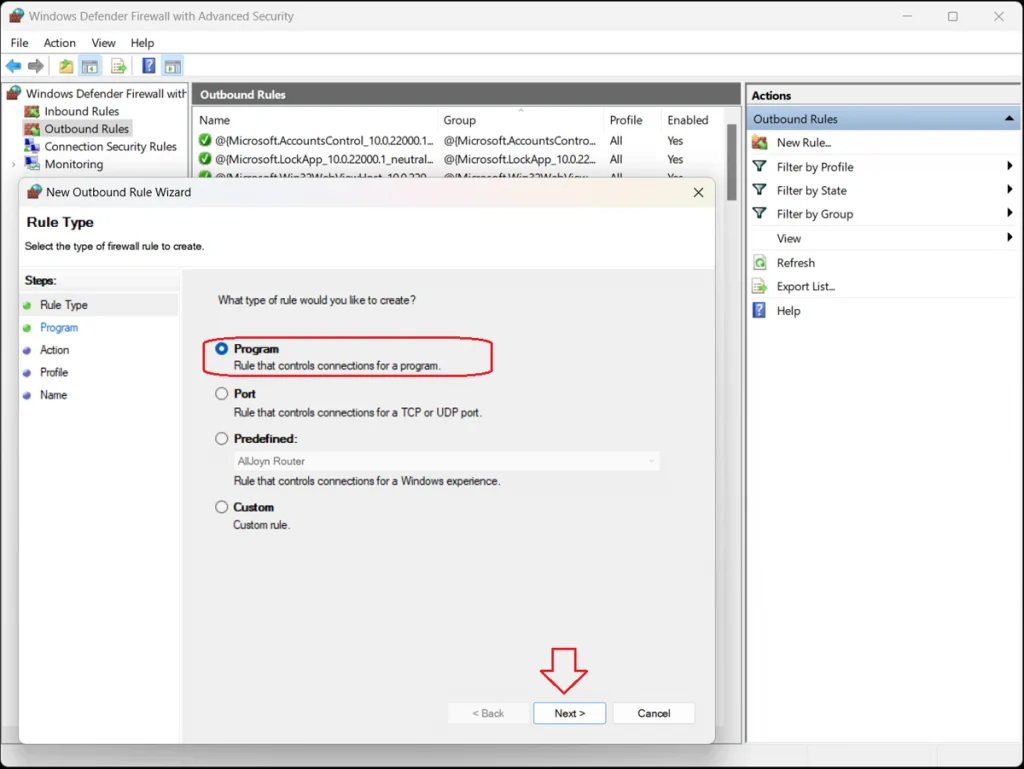
3. Create a New Rule
In the sidebar to the right of the list of existing outbound rules, click the “New Rule…” option. The New Outbound Rule Wizard opens, presenting four options for type of outbound rule:
Program
Port
Predefined
Custom
4. Select “Program”
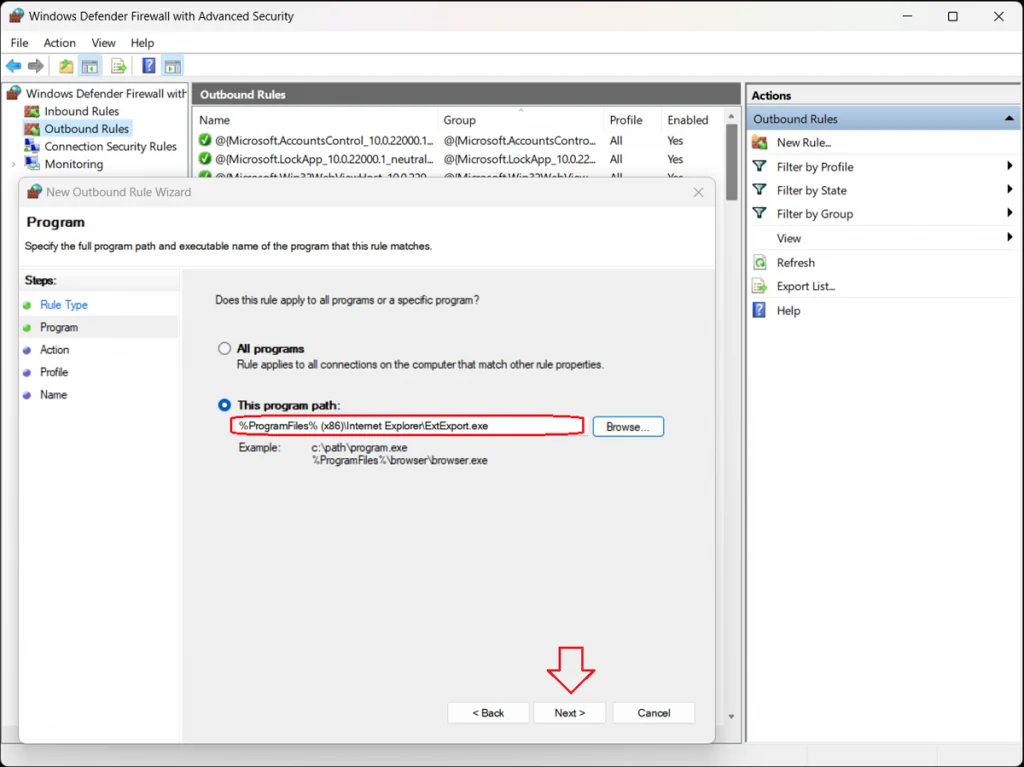
Select Program and click the “Next>” button. The Program dialog box opens to ask whether you want this rule to apply to all programs or just one specific program.
To block a specific program, select the “This program path” option and click the “Browse…” button to open the program folder.
Locate and select the executable file (.exe) for the program you want to block.
Click the “Next>” button.
5. Block the Connection
The Action window of the New Outbound Rule Wizard opens, presenting three options:
Allow the connection. This includes connections that are protected with IPsec and well as those that are not.
Allow the connection if it is secure. This includes only connections that have been authenticated by using IPsec. Connections will be secured using the settings in IPsec properties and rules in the Connection Security Rule node.
Block the connection. This blocks the connection.
Select “Block the connection” and click the “Next>” button.
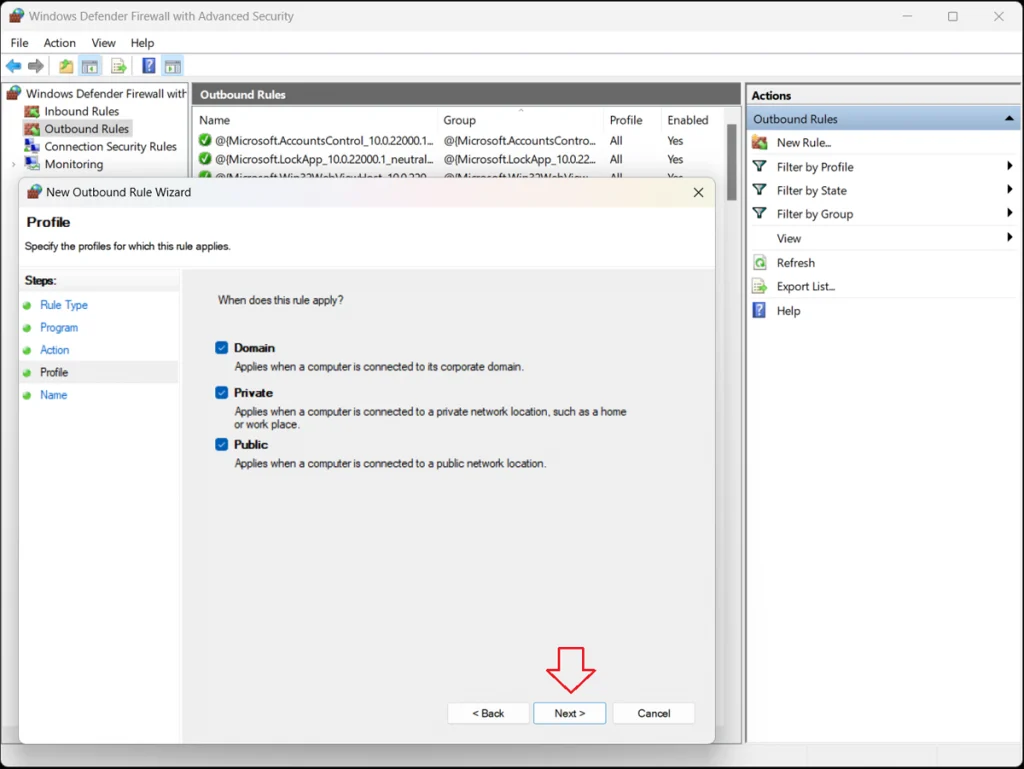
6. Specify the Profiles
The Profile window of the New Outbound Rule Wizard opens, presenting three options:
Domain–Applies when a computer is connected to its corporate domain.
Private–Applies when a computer is connected to a private network location, such as a home or workplace.
Public–Applies when a computer is connected to a public network location.
Specify when the rule will apply and click the “Next>” button.
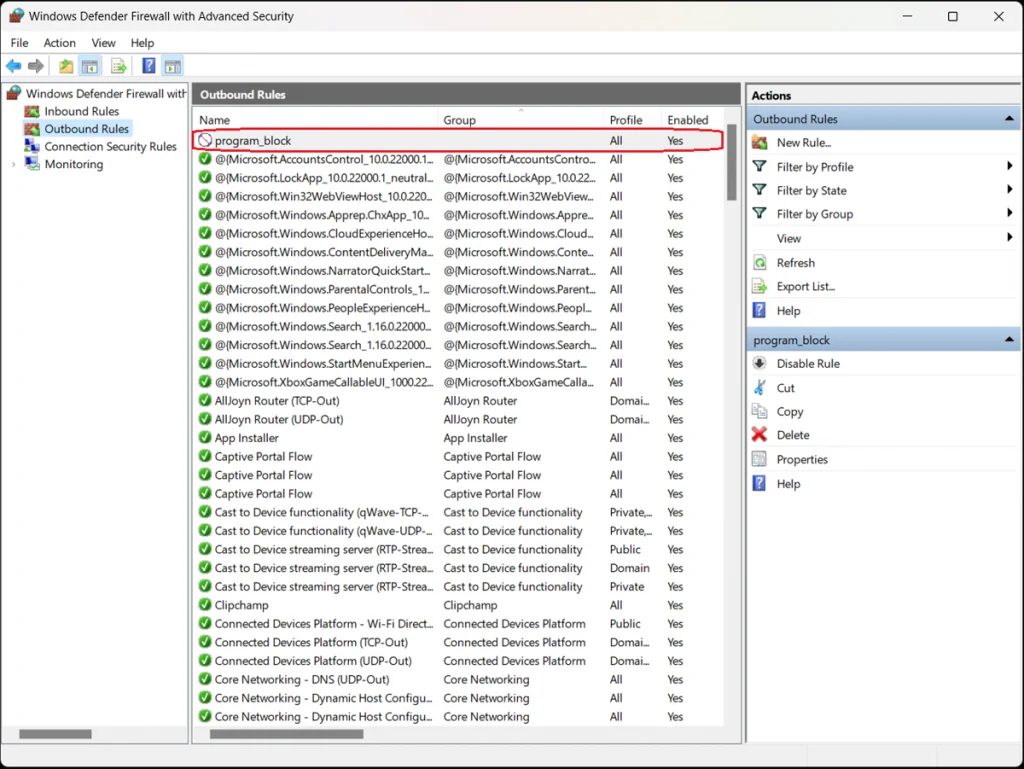
7. Assign the Rule a Name and Description
The Name window of the New Outbound Rule Wizard opens. In the empty fields, assign a name and description for the rule. Click the “Finish” button.
The Windows Defender Firewall with Advanced Security box lists all the existing outbound rules. Confirm that your new rule is included in the list. The program is now blocked; to unblock it, simply select and delete the rule.
You can unblock other programs the same way—to find them, sort the list by name, profile, state (enabled/disabled), or group and click Disable Rule in the right sidebar. You can also perform cut, copy, and delete rules or view their properties.
Bandwidth, Resolution, Refresh Rate, and Use Cases
As of 2025, both HDMI and DisplayPort have evolved dramatically. Whether you’re building a sovereign workstation, upgrading a gaming rig, or designing immersive signage, understanding these standards is essential.
📊 Specification Table
Standard
Bandwidth
Max Resolution
Max Refresh Rate
Cable Type
HDMI 2.2
96 Gbps
16K
4K @ 480Hz<br>8K @ 240Hz<br>10K @ 120Hz
Ultra96 certified
DisplayPort 2.1b
80 Gbps (DP80LL)
16K
10K @ 120Hz HDR<br>8K @ 240Hz
DP80LL low-loss
🆕 What’s New in HDMI 2.2
Bandwidth doubled from HDMI 2.1’s 48 Gbps to 96 Gbps
Supports 4K @ 480Hz, 8K @ 240Hz, and 10K @ 120Hz
Introduces Latency Indication Protocol (LIP) for better audio-video sync
Requires Ultra96 cables to unlock full spec
Ideal for AR/VR, medical imaging, light field displays, and digital signage
Enable Drag and Drop using Windows Registry Editor
SPECIAL NOTE* After This registry entry some times start menu will not work with latest build’s of Windows 11 like mine was 21H2 (OS Build 2200.739), if that happened to you just delete the added registry and and reboot.
You can enable and adjust the drag and drop sensitivity settings in Windows by creating a system restore point in the Windows Registry Editor. For example, to enable drag and drop in Windows 11 using the Windows Registry Editor, follow the given steps.
Press Windows + R on your keyboard
This will open the Run command box.
In the command box, type in the following command “regedit” and press OK.
The Windows Registry Editor is now visible on your screen
Now, navigate to the below-mentioned path
HKEY_LOCAL_MACHINE\SOFTWARE\Microsoft\Windows\CurrentVersion\Shell \Update\Packages

6 Now, right-click on the blank white space on the right navigation pane
7 Here, choose New > DWORD (32-bit) Value.
8 This will create a new value in the registry editor
9 Right-click on this newly created value file
10 Choose Rename
11 Rename this value file as follows UndockingDisabled
12 Right-click on UndockingDisabled
13 Select Modify
14 Now, change the value to 0 to 1
15 Click OK to save the settings

Now restart your computer. After restart, you will notice the taskbar will appear same as like in Windows 10 and the drag and drop functionality feature will now be restored on your computer.
How to copy members from security group to distribution groups or the other way around? This is how to copy members from one AD group to another with PowerShell.
In our example, we like to copy the users from the AD group Group-A to another AD group Group-B.
To copy members from one AD group to another will work for all group scopes and group types:
Group scope: Domain local / Global / Universal
Group type: Security / Distribution
Copy members from one AD group to another with PowerShell