
1. Click on start and type command (cmd) with run as administrator option
2. Now type following command
“slmgr.vbs -ipk <insert your new product key here>”
3. To activate windows after changing the key, run “slmgr.vbs -ato”
1. Click on start and type command (cmd) with run as administrator option
2. Now type following command
“slmgr.vbs -ipk <insert your new product key here>”
3. To activate windows after changing the key, run “slmgr.vbs -ato”
The warning message is “windows could not detect a dial-up”
Make Sure following serverices are up and running
STEP – 01
Remote Procedure Call (RPC)
Remote Procedure Call locator (RPC) (Normally this is not started.Make sure this service is in working state)Remote Access Connection Manager
Remote Access Auto Connection Manager (Normally this is not started.Make sure this service is in working state)
STEP – 02
Try those commands
1.Start – run – sc.exe config RasMan depend= “”
2.Start – run – sc config RasMan depend= TapiSrv
Still no luck ??
STEP – 03
Deleted EAP in using regedit on HKEY_LOCAL_MACHINE\SYSTEM\CurrentControlSet\Services\RasMan\PPP\EAP
No luck?
STEP 04
Try Microsoft Remote Access Connections Repir tool
https://kapothi.com/wp-content/uploads/2009/08/rarepair.exe
Hope it will fix ur problem.

Author: Brien Posey
Windows 7 features a new twist: XP Mode, which lets you run your Windows XP apps without compatibility issues. Brien Posey explains why XP Mode is significant and outlines its benefits.
One of the most exciting Windows 7 features is Windows XP Mode. It uses a brand new version of Virtual PC to provide seamless access to Windows XP applications, either through a virtual Windows XP desktop or directly through the Windows 7 desktop. Here’s a look at some of the benefits XP Mode offers.
Note: This article is also available as a PDF download.
The biggest beef that most IT folks seem to have with Windows Vista is its notorious hardware and software compatibility problems. Windows 7’s Windows XP mode allows you to run Windows XP applications without worrying about application compatibility.
Virtual PC has been around for a long time, and although it has improved from one version to the next, it still leaves a lot to be desired. Among the improvements in the new version is the ability to access the computer’s physical hard drives (including the host operating system’s volumes) through a virtual machine.
Another much needed improvement to Virtual PC (which Windows XP Mode depends on) is that it now offers USB support. It has previously been impossible to access USB devices from within a virtual machine.
I know that there are those who would disagree with me, but Windows XP hasn’t aged well. First introduced in 2001, Windows XP is quickly becoming outdated. Windows XP Mode provides enables you to run Windows XP inside a modern operating system, which helps it take advantage of some of the improvements that have been made to things like hardware support and security. Windows XP itself hasn’t changed, but because Windows XP Mode is dependent on the host operating system, it can reap some of these benefits.
Microsoft’s continued support for Windows XP has been questionable for quite some time now. Every time Microsoft gets ready to pull the plug on main stream technical support, they give in to pressure from customers and extend the support period. It’s great that Microsoft has been so accommodating, but nobody knows how long that will last. Having Windows XP Mode built into Windows 7 helps ensure that Windows XP support will be available for many years to come.
For the last several years, Microsoft has urged customers to adopt Windows Vista, but most of Microsoft’s corporate customers have chosen to continue using Windows XP. By including Windows XP mode in Windows 7, Microsoft has finally acknowledged the importance of Windows XP to its customers and given diehard XP fans a real solution that will allow them to move forward without giving up the OS they’ve depended on for almost a decade.
One of my favorite things about Windows XP Mode is that it’s completely seamless. Sure, you can work within a full-blown Windows XP virtual machine, but you don’t have to. In fact, if you close the Windows XP virtual machine, you can access your Windows XP applications directly through the Windows 7 start menu and run those applications seamlessly alongside applications that are installed directly on Windows 7.
This is the first time Microsoft has ever given us this type of support for an older product. Exchange 2000 included a copy of Exchange 5.5, but that was only included as part of the migration path for Exchange 5.0 users. Microsoft wasn’t expecting customers to actually use both products. Making Windows XP part of the Windows 7 operating system is unprecedented.
Windows has always had a bad reputation for being excessively bloated. One of the reasons for the bloat is that most versions of Windows have included a significant amount of code to provide backward compatibility with the previous version. By relying on virtualization to provide this compatibility, Microsoft may be able to greatly reduce the size of the core operating system in Windows 8.
The way Microsoft has connected Windows XP to Windows 7 through virtualization opens the door to future operating system plug-ins. Don’t be surprised if Windows 8 gives you the ability to pick and choose the legacy operating systems you want to support. Microsoft could end up offering virtualization plug-ins that will allow it to support Windows XP, Vista, and Windows 7. Using this method would allow customers to pick the type of backward compatibility they need without having to install any unnecessary legacy code
Boot Manager is compressed
If by accident having compressed the entire boot partition, then Vista will display the following error:
BOOTMGR is compressed. Press Ctrl+Alt+Del to restart
Check points for fixing compressed boot-manager:
* Boot into Windows Recovery Environment (WinRE) and perform a “Startup Repair”.
* If the above doesn’t solve the problem then boot into WinRE again, but when selecting the Vista-installation, then press “Load Drivers” (Instead of “Next”) and use the mini Windows Explorer to right-click the boot-drive and deselect “Compress this Drive” and choose Apply to sub-folders and files.
* If that also fails then boot into WinRE again, and go to the “Command Prompt” and execute these commands:
o compact /U C:\bootmgr
o compact /U C:\ntldr
if you cannot find the compact command go to x:\windows\system32\ and execute the command.

Windows expert Ed Bott finds a useful feature in Windows 7: you can play an external audio device through your computer’s speakers without any extra software using a simple configuration setting.
To activate the setting, you’ll need to plug the device into the Line In or microphone jacks, head to the Sounds panel, and then find the new Listen tab under the input jack. You’ll be able to direct the input from your iPod or other device to play directly from your speakers, an extremely useful feature if you’ve got a nice set of speakers connected to your PC.
Readers will note that you can always play your iPod’s music using iTunes, but this method works even if you connect a friend’s iPod or any other sound input you would like to use—and this method doesn’t require using any software.
You may be able to run Windows 7 on your current PC. Here’s how to find out.
Download and run the Upgrade Advisor
In general, if your PC can run Windows Vista, it can run Windows 7. But if you’re not running Windows Vista, or are just not sure if your system is ready to run Windows 7, there’s a quick way to do a simple check.
Just download, install, and run the Windows 7 Upgrade Advisor Beta. You’ll get a report telling you if your PC can run Windows 7 and if there are any known compatibility issues. If an issue can be resolved, you’ll get suggestions for next steps. For example, it may let you know that you need an updated driver for your printer and where to get it
Before you begin
Before you run the Windows 7 Upgrade Advisor Beta, be sure to plug in any USB devices or other devices such as printers, external hard drives, or scanners that are regularly used with the PC you’re evaluating.
Download Link
Internet Explorer’s “private browsing” mode is an excellent way to hide what you’re looking at from prying eyes, but it’s normally hidden under a menu… but we can make it easier to access.
The Normal Way
To open an InPrivate Browsing window, you can either use the Ctrl+Shift+P shortcut key, or just use the Safety \ InPrivate Browsing item on the menu.

And you’ll immediately see a private browsing window, which will leave no traces of your browsing history. Useful!

The other thing that private browsing is useful for is checking your email on somebody else’s computer – no danger of cookies lying around letting them back into your email account once you’ve gone.
Windows 7 Makes it Really Simple
If you are using Windows 7, all you have to do is right-click on the icon in the taskbar and choose the InPrivate option. You can also click and hold the left mouse button on the icon, and slide your mouse up… the menu will pop up and you can choose it there.

In other news, Windows 7 is really, really slick. If you haven’t already, check out our coverage of the beta release.
Create a Shortcut to Open Private Browsing Mode
If you haven’t made the switch to Windows 7 yet, you can still create your own shortcut manually. Simply create a new shortcut to Internet Explorer, and add the following to the end (after the quotes).
-private
The final path should look similar to this, depending on your system:

Give the icon a useful name indicating that it’s a private mode shortcut…

And now you have a shiny new icon to start up Internet Explorer in private browsing mode.
With Windows 7 Microsoft introduces a system maintenance tool. You are curious what it is doing, right?
It checks for:
– Broken shortcuts
– Unused desktop icons
Update:
– Troubleshooting history / Error reports taking up disk space
– System Timecorrection
– Disk Volume errors
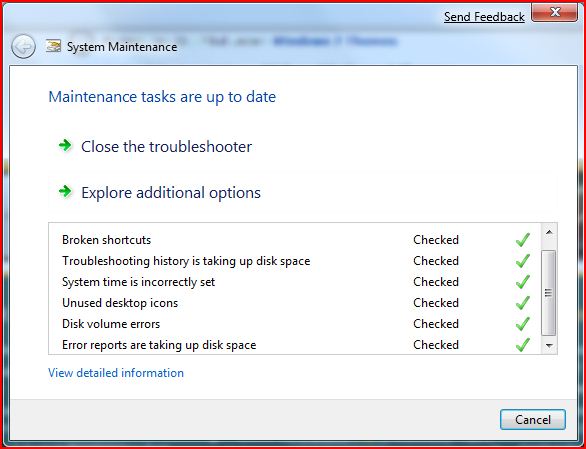
And also collects system information:
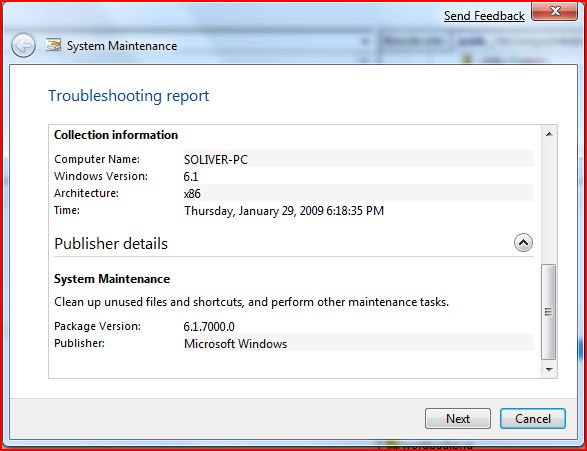
Random Info: I took both screens with the new Windows 7 snipping tool, which will increase your productivity a lot. What I don’t like about it is the red border and it saves the file extension in uppercase-letters if you do not type them in.
Anyway, I think Microsoft should deliver all the tools we know from TuneUpUtilites. I do not want to buy additional software to do all the tweaks that are hidden in the registry.
They should include:
– Optimize performance / disable certain graphic elements
– Registry cleaner
– Cookie / Temp cleaner
– Clear History / Favorites / etc
– Advanced Defrag
What else would you like in there if you could change the system maintenance tool ?
Update:
This is the latest system maintenance tool:
