Category Archives: Windows 10

Slide to Shut Down a Windows 10 PC Like a Windows Phone

When Microsoft first released Windows 8, shutting it down was an annoying experience. However, it did get easier with Windows 8.1, and now there are several options you have now to shutdown, sleep, or hibernate in Windows 10.

Create Shortcut to Slide to Shutdown Windows 10 PCs

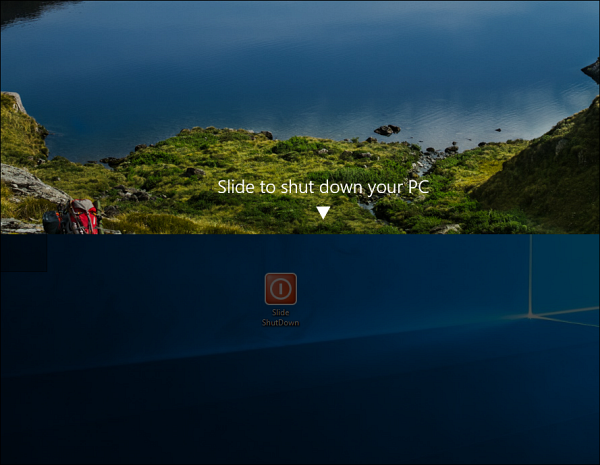
If you’re the owner of a Surface Pro, you can hold the power button down for a few seconds to get the slide to power off screen, but this creates a shortcut to do the same thing on a traditional laptop or desktop PC.

It’s just a matter of finding the file that’s hidden deep in the System32 folder. There are a couple of ways to do this. First, you could navigate there by going to C:\Windows\System32 and doing a search for sidletoshutdown.exe. Then send it to the desktop as a shortcut

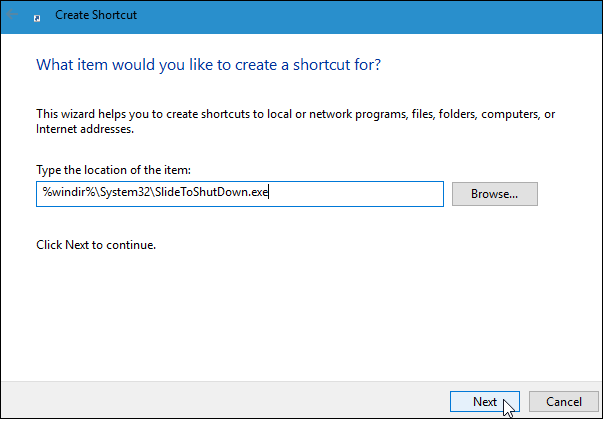
Or, if you don’t want to navigate through the file system, here’s an easier way to do it. Right-click the desktop and select to create a new shortcut and enter the following path:

%windir%\System32\SlideToShutDown.exe

shortcut


3-name-shortcut


There you go! Now when you tap or click the shortcut, you’ll see the following screen. Swipe it down to power off your PC. If you don’t swipe it down for 10 seconds, it will disappear.

slideshutdown


How to Switch from the Start Menu to the Start Screen in Windows 10

To switch from the Start Menu to the Start Screen in Windows 10, head to your Windows Desktop, right-click on the Taskbar, and choose Properties. In the Taskbar and Start Menu Properties window, navigate to the Start Menu tab and find the checkbox titled “Use the Start menu instead of the Start screen.” As you can guess from its description, uncheck this box to restore the Windows 8-style Start Screen interface in Windows 10.


Click OK to accept the change and close the window. Switching from the Start Menu to the Start Screen in Windows 10 requires the user to sign out before the change will take effect. A dialog box will appear to notify you of this. If your work is saved and you’re ready to sign out, click Sign out and change settings to complete the process.

Windows 8 : Error 0x800F0906 while enabling Microsoft .NET Framework 3.5.1


[UPDATE 2025 MARCH]

to enable .net 3.5 For server 2022 and 2025 try this command

Dism.exe /online /enable-feature /featurename:NetFX3 /All /Source:E:\sources\sxs /LimitAccess

Replace E: with your DVD/CD Rom Drive letter


[UPDATED ON 2019 JAN 25]

Make sure the Windows 8 disk is in the drive (if your drive is not the d:\ drive, change the source drive letter to match your drive)

dism.exe /online /enable-feature /featurename:NetFX3 /Source:d:\sources\sxs

The install will take a few minutes to run.

Note* – If Windows update service is disabled , enable it before run the command other wise you will get more errors like Error: 0x800f081f

NEW UPDATE –

IF YOUR HAVING BUILD VERSION 1806 USE THE SAME BUILD DVD TO INSTALL THE FEATURE

TRY THIS COMMAND IF ABOVE COMMAND IS NOT WORKING

Dism.exe /online /enable-feature /featurename:NetFX3 /source:d:\sources\sxs /LimitAccess 


How to Find the Wi-Fi Password Using CMD in Windows?

Finding Wi-Fi Password

Step1: Press start and type CMD, right-click on the Command Prompt option shown as a search result and click on Run as administrator.  

Step 2: Type netsh wlan show profile in the command prompt and press Enter to show a list of network names that we connect to.

Step 3: Type netsh wlan show profile name= “Wi-Fi name” key=clear, Replace ‘Wi-Fi name’ with your wireless network name.

Step 4: Scroll through the results until you find an entry named Key Content Wi-Fi password will be listed next to it.