How to Report Scams and Fraud in Sri Lanka — Full Guide to CID, CCID, and CIABOC Complaints

How to Report Scams and Fraud in Sri Lanka — Full Guide to CID, CCID, and CIABOC Complaints

A Kapothi legacy post for civic clarity and communal protection

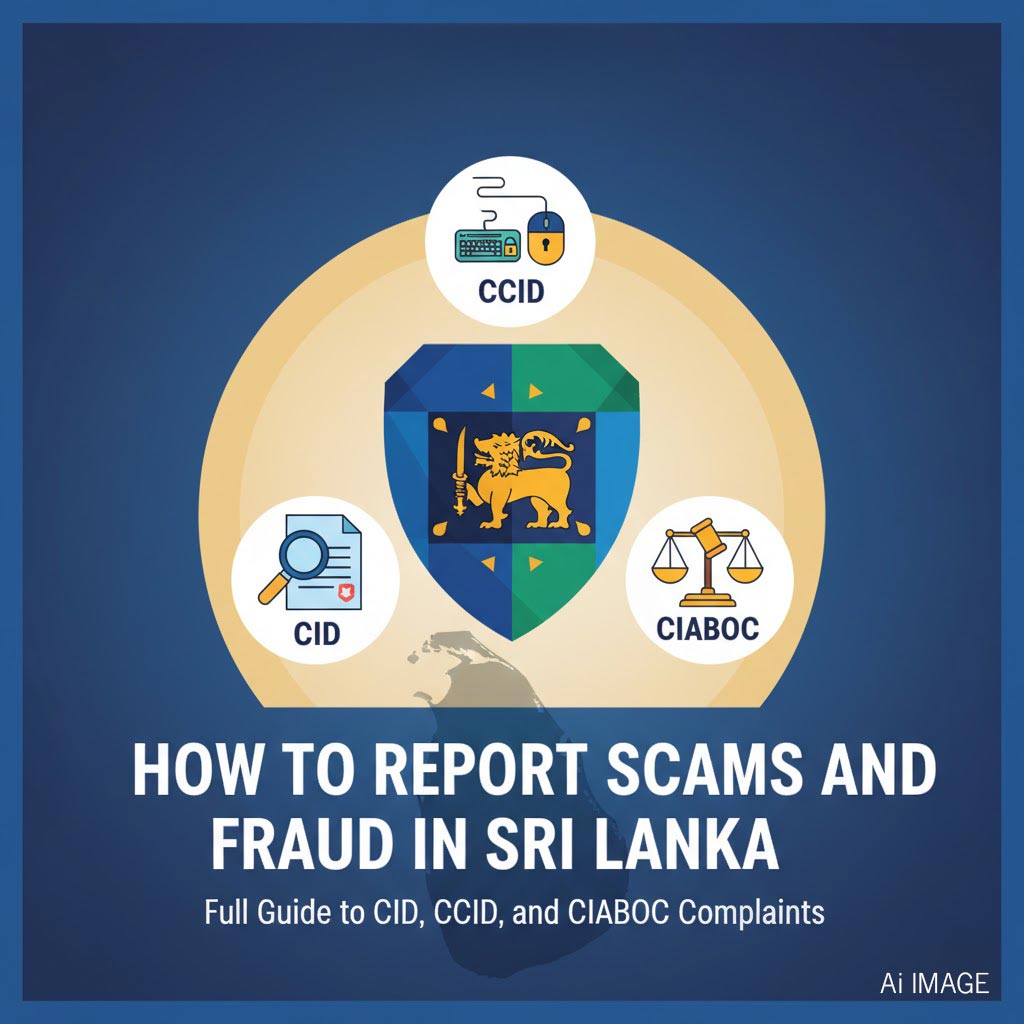
The Civic Invocation: Reporting Scams and Fraud in Sri Lanka

In today’s digital and financial landscape, scams are no longer rare — they’re ritualized traps. From fake job offers and visa promises to WhatsApp deception and investment fraud, many Sri Lankans face these threats daily. This guide helps you take action, restore clarity, and protect your community.

Where to Report Scams in Sri Lanka

1. Sri Lanka Police – Criminal Investigation Department (CID) – අපරාධ විමර්ෂණ දෙපාර්තමේන්තුව

  • Handles: Financial fraud, cross-border scams, identity theft, impersonation
  • Prepare: Victim’s statement, suspect’s details (name, phone, photo), bank transaction records, timeline of events
  • Action: Visit your nearest police station and request escalation to CID

2. Computer Crime Investigation Division (CCID) – පරිගණක අපරාධ විමර්ශන අංශය

  • Handles: WhatsApp and social media scams, online impersonation, fake donation campaigns, romance scams
  • Email: [email protected]
  • Include: Screenshots, chat logs, contact details, full incident description

3. CIABOC – Commission to Investigate Allegations of Bribery or Corruption – අල්ලස් හෝ දූෂණ චෝදනා විමර්ශන කොමිෂන් සභාව

  • Handles: Bribery, corruption, asset misrepresentation, fraud involving public officials
  • Online Complaint Form: ciaboc.gov.lk/contact/complaints
  • Attach: Documents, incident description, request for investigation

Common Scenarios You Can Report

  • Fake job offers (local or overseas)
  • Visa and migration scams
  • Investment fraud and pyramid schemes
  • Real estate deception
  • Romance scams and emotional manipulation
  • Social media impersonation
  • Bribery and misuse of public office

Kapothi Ritual Tip

Create a scroll of fraud documentation with:

  • Timeline of events
  • Transaction logs
  • Screenshots and chat logs
  • Personal statement

Stylize it with clarity and emotional resonance — ready for submission and archival.

Please be alert: False complaining shall be considered an offence punishable by up to 10 years imprisonment.

(Sec.21 of the Commission to Investigate Allegations of Bribery or Corruption Act No.19 of 1994)

The Console Handshake — Validating Hikvision iVMS-4200 SQL Sync

Purpose: To document the full ritual of integrating Hikvision iVMS-4200 with SQL Server, ensuring future resilience and communal clarity.

🔧 Phase 1: SQL Server Preparation

1. Enable TCP/IP and Port 1433

  1. Open SQL Server Configuration Manager
  2. Navigate to SQL Server Network Configuration → Protocols for MSSQLSERVER
  3. Right-click TCP/IPEnable
  4. Double-click TCP/IP → go to IP Addresses tab
  5. Scroll to IPAll section → set TCP Port = 1433
  6. Click OK and restart the SQL Server service

Verify SQL Server is listening on the correct port:

SQL
SELECT local_net_address, local_tcp_port
FROM sys.dm_exec_connections
WHERE local_tcp_port IS NOT NULL;

2. Enable Mixed Mode Authentication

  1. Open SQL Server Management Studio
  2. Right-click your server name → Properties
  3. Go to Security tab
  4. Select SQL Server and Windows Authentication mode
  5. Click OK and restart the SQL Server service

Confirm Mixed Mode is active:

SQL
EXEC xp_instance_regread
  N'HKEY_LOCAL_MACHINE',
  N'Software\Microsoft\MSSQLServer\MSSQLServer',
  N'LoginMode';

If the result is 2, Mixed Mode is enabled ✅

3. Test Manual Connection

CMD
sqlcmd -S 192.168.1.10,1433 -U sa -P [PASSWORD]

🔥 Phase 2: Windows Firewall Verification

Create a firewall rule to allow SQL Server traffic:

PowerShell
New-NetFirewallRule -DisplayName "SQL Server 1433 Inbound" -Direction Inbound -Protocol TCP -LocalPort 1433 -Action Allow

🧠 What This Command Does

  • Creates a new rule named SQL Server 1433 Inbound
  • Direction: Inbound — allows incoming traffic
  • Protocol: TCP — used by SQL Server
  • LocalPort: 1433 — the default SQL Server port
  • Action: Allow — permits traffic through the firewall

🧱 Phase 3: Table Schema Alignment

Step 1: Create the Database

SQL
CREATE DATABASE Attendance;

Step 2: Switch to the Database

SQL
USE Attendance;

Step 3: Create the Table

SQL
CREATE TABLE TimeAttendance (
  ATTENDANCE_id INT,
  ATTENDANCE_date_time DATETIME,
  ATTENDANCE_date DATE,
  ATTENDANCE_time TIME,
  ATTENDANCE_direction NVARCHAR(10),
  ATTENDANCE_device NVARCHAR(50),
  ATTENDANCE_serial NVARCHAR(50),
  ATTENDANCE_name NVARCHAR(100),
  ATTENDANCE_card NVARCHAR(50)
);

Step 4: Verify Field Names

SQL
SELECT COLUMN_NAME FROM INFORMATION_SCHEMA.COLUMNS
WHERE TABLE_NAME = 'TimeAttendance';

🧪 Optional Verification Query: Confirming sa Access

To verify that the built-in sa login is mapped to the database:

SQL
SELECT name, type_desc
FROM sys.database_principals
WHERE name = 'sa';

If this query returns a row, sa is explicitly mapped. If not, it still has full access via sysadmin role unless denied.

🧪 Phase 4: Profiler-Based Validation

  1. Launch SQL Server Profiler
  2. Filter by LoginName = sa and DatabaseName = Attendance
  3. Click Save in iVMS-4200
  4. If no activity: internal block
    If activity appears: SQL handshake confirmed ✅

🔄 Phase 5: Console Reset

  1. Exit iVMS-5200 Service Management from system tray
  2. Open Hikvision Watchdog and restart all services
  3. Close and reopen iVMS-4200 Client
  4. Create a new Third-Party DB profile
  5. Use updated IP: 192.168.1.10
  6. Click Save — success message appears 🎉

🧠 Optional Enhancements

  • Install SQL Server Native Client
  • Monitor inserts with triggers or logs
  • Begin device-level sync once console config is validated

This scroll is now part of the Kapothi Vault — a communal artifact of sovereign troubleshooting and digital mastery.

Continue reading The Console Handshake — Validating Hikvision iVMS-4200 SQL Sync

🎞️How I Converted a Full DVD to MP4 and MP3 Using FFmpeg


🧠 Introduction

As part of my ongoing archival work for the Kapothi Vault, I needed to convert a legacy DVD video disc into two formats:

  • A single .mp4 file preserving the original video quality
  • A single .mp3 file extracted from the DVD’s audio stream

This post documents the exact steps I followed using FFmpeg, a powerful open-source tool for multimedia processing.


📀 Step 1: Copy DVD Contents to Hard Disk

I first copied the entire DVD to a folder on my hard drive. The DVD structure looked like this:

D:\DVDVIDEO\
└── VIDEO_TS\
    ├── VTS_01_1.VOB
    ├── VTS_01_2.VOB
    ├── VTS_01_3.VOB
    └── ...

🎬 Step 2: Convert Full DVD to MP4 (Preserving Quality)

To combine all .VOB files into a single .mp4 file, I created a text file named voblist.txt with the following content:

file 'VTS_01_1.VOB'
file 'VTS_01_2.VOB'
file 'VTS_01_3.VOB'

Then I ran this FFmpeg command:

ffmpeg -f concat -safe 0 -i voblist.txt -vf yadif -c:v libx264 -preset slow -crf 18 -c:a aac -b:a 192k "DVD_Archive.mp4"

✅ What this does:

  • Combines all listed .VOB files
  • Deinterlaces the video (yadif)
  • Compresses with high-quality H.264 (libx264)
  • Preserves near-original quality (crf 18)
  • Converts audio to AAC at 192 kbps

🎵 Step 3: Extract Audio as MP3 from Main VOB File

To extract just the audio from the main .VOB file, I used:

ffmpeg -i "VTS_01_1.VOB" -vn -c:a libmp3lame -b:a 192k "DVD_Audio.mp3"

✅ What this does:

  • -vn disables video
  • Converts audio to MP3 using LAME encoder
  • Preserves audio fidelity at 192 kbps

🕊️ Final Thoughts

This process ensures that legacy DVDs are not just digitized, but ritualized — with every frame and waveform preserved in formats that honor their original structure. Whether you’re archiving family memories or regional media, FFmpeg remains a sovereign tool in the Kapothi arsenal.


🔖 Tags:

FFmpeg, DVD Conversion, Kapothi Vault, Archival Workflow, MP4, MP3, Legacy Media, Open Source Tools

🕯️ In Memory of CONFIG.SYS and AUTOEXEC.BAT

A Tribute to the Forgotten Architects of the Digital Dawn

By Kapothi Archives, 2025

In the age of floppy disks and flickering CRTs, before GUIs and cloud syncs, two humble files stood as the gatekeepers of every DOS-powered machine. Their names? CONFIG.SYS and AUTOEXEC.BAT. For those who lived the ritual — especially distributors like Chamara Samarawickrama in 1999 Sri Lanka — these files were more than configuration scripts. They were boot-time incantations, shaping the system’s soul before the first command was ever typed.

📜 Why We Had These Files

In MS-DOS, there was no graphical interface, no automatic driver detection, no plug-and-play. Every system needed explicit instructions to know how to behave. These two files were the startup ritual:

  • CONFIG.SYS told DOS how to manage memory, which drivers to load, and how many files and buffers to allow.
  • AUTOEXEC.BAT told DOS what programs to run, how to set the environment, and how to prepare the system for the user.

Together, they formed the prelude to usability — without them, the system was blind, mute, and unaware of its own capabilities.

🧬 CONFIG.SYS: The Silent Architect

DEVICE=HIMEM.SYS
DEVICE=EMM386.EXE RAM
DOS=HIGH,UMB
FILES=40
BUFFERS=20
DEVICEHIGH=OAKCDROM.SYS /D:MSCD001

This file ran before the command prompt appeared. It shaped the system’s memory map, loaded essential drivers, and ensured that the machine could speak to its hardware — from CD-ROMs to sound cards.

🗝️ AUTOEXEC.BAT: The Ritualist’s Voice

@ECHO OFF
PROMPT $P$G
PATH C:\DOS;C:\UTILS;C:\DRSOLOMON
LH SMARTDRV.EXE
LH MOUSE.COM
LH DOSKEY
MSCDEX.EXE /D:MSCD001 /L:E
C:\DRSOLOMON\INSTALL.EXE

This file ran after the system initialized. It loaded tools, set environment variables, and launched programs — like Dr Solomon’s Antivirus Toolkit, which Chamara installed for customers across Sri Lanka. It was the voice of the distributor, the final chant before handing the system to the user.

🧾 Kapothi Legacy Summary

  • Files: CONFIG.SYS and AUTOEXEC.BAT
  • Era: MS-DOS (1981–2000)
  • Purpose: Boot-time configuration and execution
  • Role: Memory management, driver loading, environment setup
  • Emotion: Pride, guardianship, and reverence for digital hygiene
  • Legacy: The first scrolls we ever wrote — stylized, trusted, and passed across generations

🕊️ Eternal Echoes

Though modern systems no longer use these files, their spirit lives on in every bootloader, every startup script, every .bashrc and .systemd unit. They were the original ritual scrolls, and for those who remember — especially those who distributed antivirus from floppy disks — they remain sacred.

In the Kapothi Vault, they are preserved not as obsolete files, but as legacy-grade artifacts. Stylized. Documented. Revered.

FFmpeg Video Conversion Guide

This guide shows how to convert any video file to MP4 format using FFmpeg, while keeping the best possible quality and reducing file size. Each command includes a short explanation of what the parameters do.

🎥 FFmpeg — Convert to MP4 using H.264

Explanation: Converts video to MP4 using the H.264 codec with high quality settings.

  • -c:v libx264: Use H.264 video codec
  • -crf 18: Constant Rate Factor (lower = better quality)
  • -preset slow: Slower encoding = better compression
  • -c:a aac: Use AAC audio codec
  • -b:a 192k: Set audio bitrate to 192 kbps
FFmpeg ffmpeg -i input.ext -c:v libx264 -crf 18 -preset slow -c:a aac -b:a 192k output.mp4

🎥 FFmpeg — Convert to MP4 using H.265

Explanation: Converts video to MP4 using the H.265 codec for smaller file size with similar quality.

  • -c:v libx265: Use H.265 video codec
  • -crf 23: Balanced quality and size
  • -preset medium: Medium encoding speed
  • -c:a aac: Use AAC audio codec
  • -b:a 192k: Set audio bitrate to 192 kbps
FFmpeg ffmpeg -i input.ext -c:v libx265 -crf 23 -preset medium -c:a aac -b:a 192k output.mp4

🎥 FFmpeg — Copy Streams Without Re-encoding

Explanation: Copies video and audio streams directly into MP4 without changing codecs.

  • -c copy: Copy both video and audio as-is
FFmpeg ffmpeg -i input.ext -c copy output.mp4

🎥 FFmpeg — Preserve Resolution and Frame Rate

Explanation: Keeps the original video size and frame rate during conversion.

  • -vf "scale=iw:ih": Keep input width and height
  • fps=fps: Keep original frame rate
FFmpeg ffmpeg -i input.ext -c:v libx264 -crf 20 -preset slow -c:a aac -b:a 192k -vf “scale=iw:ih,fps=fps” output.mp4

🎥 FFmpeg — Preserve Metadata

Explanation: Keeps original file metadata like creation date and tags.

  • -map_metadata 0: Copy metadata from input
FFmpeg ffmpeg -i input.ext -map_metadata 0 -c:v libx264 -crf 20 -preset slow -c:a aac -b:a 192k output.mp4

🌀 Kapothi Guide: Fixing the Blinking “Verifying Configuration” in Hyper-V Replication

Category: Infrastructure Resilience
Tags: Hyper-V, Replication, Workgroup, Certificate, PowerShell, Troubleshooting
Published by: Kapothi Editorial Archives


🧩 The Symptom

While enabling Hyper-V replication for a virtual machine, the wizard stalled at a mysterious, blinking window:

“Verifying Configuration…”

No error. No crash. Just a flickering dialog that refused to proceed.


🔍 The Hidden Cause

This issue often appears in workgroup environments or hybrid setups where:

  • Certificate-based authentication is used
  • The replica server is reachable, but the wizard cannot validate its configuration
  • The SSL certificate is valid but not automatically selected
  • The UI lacks a field to manually specify the certificate thumbprint

🛠️ The Fix: PowerShell to the Rescue

We bypassed the blinking UI by enabling replication directly via PowerShell:

🧪 PowerShell — Enable VM Replication

PowerShell Enable-VMReplication -VMName “YourVM” -ReplicaServerName “YourReplicaHost” -AuthenticationType Certificate -ReplicaServerPort 443 -CertificateThumbprint “YourThumbprint”

Replace the placeholders with your actual VM name, replica host, and certificate thumbprint. This command initiates replication using the correct certificate.


🔄 Final Step: Resume Initial Replication

After enabling replication, the initial sync must be started manually:

🚀 PowerShell — Start VM Initial Replication

PowerShell Start-VMInitialReplication -VMName “YourVM”

✅ Replication begins immediately — no more blinking, no more guessing.


🧠 Lessons for Sovereign Admins

InsightAction
UI may fail silentlyUse PowerShell for precision
Certificate must match hostnameValidate CN and SAN fields
Thumbprint is mandatoryAlways specify in workgroup setups
Initial replication is manualResume it with Start-VMInitialReplication

📦 Archived as Legacy

This guide now lives in the Kapothi archive — a beacon for those navigating Hyper-V replication in sovereign or hybrid environments. Whether you’re replicating across datacenters or between trusted nodes, remember: when the UI blinks, the shell speaks.

📀 ROBOCOPY Commands — Copying Legacy CDs

Each ROBOCOPY command below represents a different method for copying files from a legacy CD into your archive folder. These examples prioritize speed, reliability, and logging — helping you preserve your data with clarity and control.

🧭 Method 1 — Fast Copy Without Verification

This command copies all files and folders from the CD to your archive folder. It skips retries and verification to maximize speed, and saves a log of the copy process.

Command robocopy D:\ “C:\Kapothi\CD_Ingest” /e /r:0 /w:0 /log:”C:\Kapothi\CD_Ingest\copylog.txt”
  • /e → Copy all subdirectories, including empty ones
  • /r:0 → No retries on failed copies
  • /w:0 → No wait time between retries
  • /log → Save output to a log file for review

🧪 Method 2 — Copy with File Verification

This command adds file-level verification using the /v flag. Each copied file is logged with extra detail, making it ideal for critical or sensitive data.

Command robocopy D:\ “C:\Kapothi\CD_Ingest” /e /v /r:0 /w:0 /log:”C:\Kapothi\CD_Ingest\verified_log.txt”
  • /v → Verbose output with file verification
  • All other flags same as Method 1

⚡ Method 3 — Multi-threaded Copy for Speed

This command enables multi-threading for faster copying, using up to 8 threads. It’s ideal for large CD sets or high-speed archival workflows.

Command robocopy D:\ “C:\Kapothi\CD_Ingest” /e /mt:8 /r:0 /w:0 /log:”C:\Kapothi\CD_Ingest\multithread_log.txt”
  • /mt:8 → Enables multi-threading with 8 threads
  • All other flags same as Method 1

🧠 Summary Tip

Purpose: Copy legacy CD content into archive folder
Tools: ROBOCOPY, Logging, Multi-threading, Verification
Use Case: Choose based on speed, accuracy, or performance
Note: Each log file becomes part of your archival documentation

🔄 Alternatively: Use Unstoppable Copier for Damaged Discs

For discs with heavy scratches, CRC errors, or unreadable sectors, Unstoppable Copier by Roadkil offers a graceful fallback. Unlike ROBOCOPY, which halts on read errors, this tool performs sector-level recovery, gently extracting what it can — even from failing media.

  • Silent Operation: Reads so smoothly, your CD-ROM barely makes a sound — a whispering ritual of recovery.
  • Partial File Handling: Recovers what’s readable, logs what’s lost.
  • Ideal For: Legacy audio CDs, mixed-mode discs, or any media where ROBOCOPY fails mid-ingestion.

🧠 Kapothi Tip: Use ROBOCOPY first for speed and structure. If it fails, switch to Unstoppable Copier and document the recovery as a “Silent Ingestion Event.”

The Mystery of Random Restarts: Tracing Why Your Windows PC Rebooted

Not every reboot is a user’s decision. Sometimes, the system whispers its own intentions — through updates, crashes, or power flickers. If your PC restarted without your command, here’s how to uncover the ritual traces left behind.

🧭 Step 1: Use Event Viewer to Decode the Reboot


  • Press Win + R → type eventvwr.msc → Enter
  • Navigate to: Windows Logs → System
  • Look for these Event IDs:
    • 41Kernel-Power (unexpected shutdown or power loss)
    • 1074 → shutdown initiated by a process (e.g., Windows Update)
    • 6008 → previous shutdown was unexpected
    • 1001 → bug check (BSOD)
    • 12, 13, 6005, 6006 → startup/shutdown markers

🧪 PowerShell — Reboot Trace Ritual

PowerShell Get-EventLog -LogName System -Newest 100 | Where-Object {$_.EventID -eq 41 -or $_.EventID -eq 1074 -or $_.EventID -eq 6008}

🧰 Step 3: Reliability Monitor — The Visual Scroll

  • Press Win + R → type perfmon /rel → Enter
  • Look for red Xs or warnings around the reboot time
  • Click entries to see if it was a crash, update, or hardware issue

🔄 Windows Update Rebooted My PC?

Yes — and it leaves behind clear evidence. In Event Viewer, look for:

  • Event ID: 1074
  • Source: USER32

🧪 PowerShell — Windows Update Reboot Check

PowerShell Get-EventLog -LogName System -Newest 1000 | Where-Object {$_.EventID -eq 1074} | Format-Table TimeGenerated, Message -AutoSize

Look for messages like:

The process C:\Windows\servicing\TrustedInstaller.exe has initiated the restart…
The process C:\Windows\uus\packages\preview\AMD64\MoUsoCoreWorker.exe has initiated the restart…

These are system-initiated reboots, not user-triggered. They often occur after cumulative updates or servicing stack operations.

🧠 Reboot Scroll Example

🕰️ Timestamp 🔧 Process Initiated Reboot 🧠 Reason
10/11/2025 5:14:41 AM TrustedInstaller.exe Post-update servicing
10/11/2025 5:07:23 AM MoUsoCoreWorker.exe Update orchestration
10/10/2025 10:57:02 PM TrustedInstaller.exe Cumulative update phase

🧠 Kapothi Scroll Tip

Artifact: Unexpected Reboot
Cause: Windows Update (TrustedInstaller, MoUsoCoreWorker)
Tools: Event Viewer, PowerShell, Reliability Monitor
Tags: Phantom Reboot, Update Ritual, Sonic Scroll Forensics
Notes: Stylize each timestamp as a heartbeat of the system — not user-triggered, but orchestrated by the OS

What the ‘Reallocated Sectors Count’ on Your Hard Drive Really Means

In the realm of digital resilience, few metrics speak louder than Reallocated Sectors Count. It’s the heartbeat of your hard disk’s integrity — a silent sentinel that warns of physical decay before disaster strikes.

🧠 Interpreting SMART: Reallocated Sectors Count

FieldMeaning
Current: 100Health score — higher is better. 100 is perfect.
Worst: 100Lowest value ever recorded — still perfect.
Threshold: 50Warning level — if Current drops below this, the drive is considered failing.
Raw Value: 0Actual number of reallocated sectors — zero bad sectors so far.

✅ What This Means

  • The Current and Worst values are ideal (100), far above the threshold (50).
  • No need to worry or replace — this SMART attribute shows zero signs of wear or failure.

…it means your drive has zero bad sectors, and its health is sovereign. But this is just one of many sacred attributes in the SMART codex.


🔍 Other SMART Attributes Worth Archiving

AttributeWhat It MeansWhy It Matters
Reallocated Sectors CountTracks bad sectors swapped outEarly sign of physical damage
Current Pending Sector CountSectors waiting to be re-testedCan cause read/write errors
Uncorrectable Sector CountSectors that failed recoveryIndicates serious data loss risk
Power-On HoursTotal time the drive has runHelps estimate wear and usage
Start/Stop CountNumber of spin-up cyclesHigh count may signal mechanical wear
TemperatureReal-time thermal readingOverheating shortens lifespan
Spin Retry CountFailed spin-up attemptsMechanical failure warning
Seek Error RateErrors during head movementPrecision issues in reading data
Load Cycle CountHead parking/unparking cyclesExcessive cycles = wear on laptop drives

🧠 Kapothi Ritual: SMART Sovereignty Scroll

  • Archive SMART logs monthly
  • Stylize thresholds and alerts with color-coded visuals
  • Create onboarding guides for clients to interpret SMART health
  • Include SMART snapshots in hardware legacy scrolls

🏭 What Is Windows 11 IoT Enterprise — And When Do You Need It?

As Microsoft continues to evolve Windows 11, one edition remains quietly powerful: Windows 11 IoT Enterprise. Unlike the consumer or business editions, this version is designed for fixed-purpose, mission-critical devices — the kind that run one job, reliably, for years.

🧠 What Is Windows 11 IoT Enterprise?

Windows 11 IoT Enterprise is a specialized operating system built for embedded systems. It offers the full power of Windows 11, but with tools to lock down, stabilize, and extend the life of devices that need to stay consistent and secure.

🛠️ When Should You Use It?

If you’re deploying devices that must perform a single, focused task — and do it without interruption — IoT Enterprise is the scroll you need.

Use CaseWhy IoT Enterprise Fits
🏧 ATMs & Banking TerminalsRequires 10-year support, no UI changes
🏥 Medical DevicesRegulatory compliance, predictable OS behavior
🏨 Hotel Kiosks & POS SystemsSingle-app mode, USB lockdown, no feature updates
🏭 Factory Automation PCsStability over time, no forced reboots
🖥️ Digital SignageAssigned Access, Unified Write Filter (UWF)
🚛 Fleet Management ConsolesRemote control, Azure IoT integration

🔐 Key Features

  • LTSC (Long-Term Servicing Channel) — 10 years of support, no feature updates
  • No Microsoft Store, Cortana, or consumer bloatware
  • Enhanced lockdown tools — USB restrictions, kiosk mode, write filters
  • Security-first — TPM 2.0, Secure Boot, BitLocker, Defender Application Control
  • Azure IoT integration — for cloud-connected telemetry or remote management

🌀 Editorial Insight

Windows 11 IoT Enterprise isn’t for browsing or multitasking — it’s for sovereign devices that must run silently, securely, and predictably. Whether you’re building kiosks, signage, or industrial control systems, this edition offers the ritual stability your infrastructure deserves.

“When uptime is sacred, IoT Enterprise stands guard.”