The above commands help you to determine the most useful information about the RAM installed on your computer. However, there is another command you can use to query all the available details at the same time.
To view all the memory details on Windows 10/11, then use these steps:
Open Start.
Type Command Prompt, right-click the top result, and select the Run as administrator option.
Type the following command to list every memory detail possible and press Enter wmic memorychip list full
Confirm the available information for each memory module installed on the device.
(Optional) Type the following command to view only the specific details and press Enter wmic memorychip get devicelocator, manufacturer, partnumber, serialnumber, capacity, speed, memorytype, formfactor
This tutorial on how to block a program in a firewall applies to computers running Microsoft Windows 11 operating system. Some details might vary slightly for Windows 10 or older versions, but the procedure is essentially the same.
1. Open the Settings for Windows Defender Firewall with Advanced Security
Use one of the following methods to open the Windows Defender Firewall with Advanced Security.
Method 1
Press the Windows key and the R key at the same type to open the Run dialog box.
Type “WF.msc” into the box.
Hit the “OK” button or Enter.
Method 2
Press the Windows key to open the search function.
Start typing “Windows Defender Firewall” and select the application when it appears.
From the Windows Defender Firewall screen, select Advanced Settings in the left sidebar.
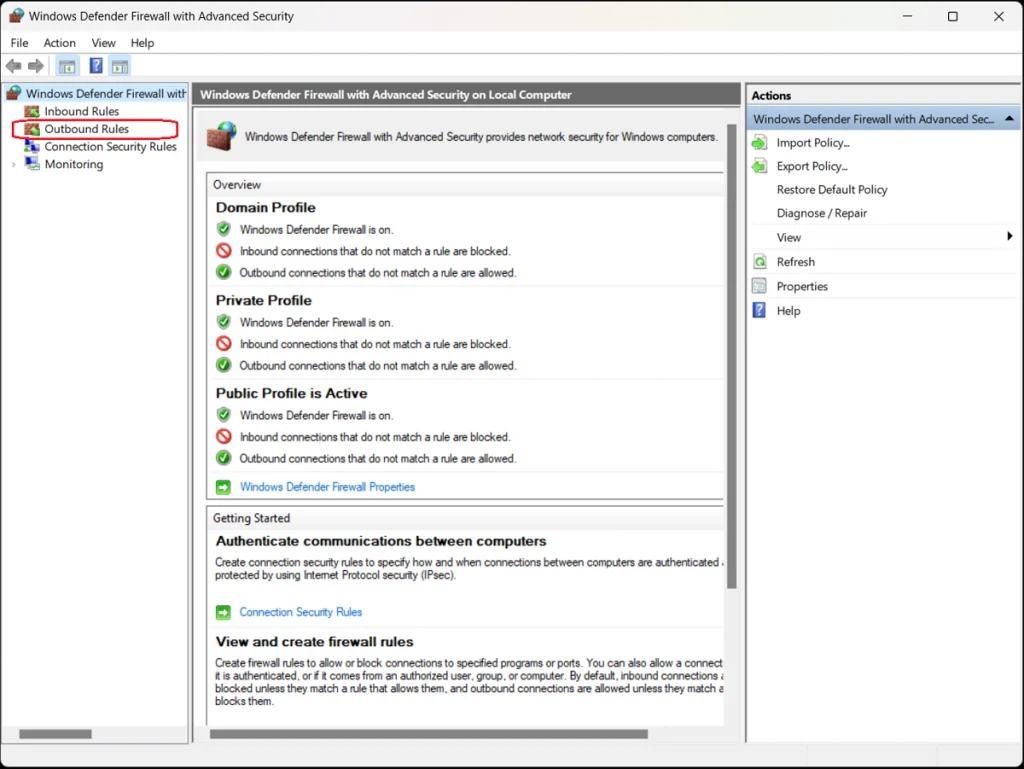
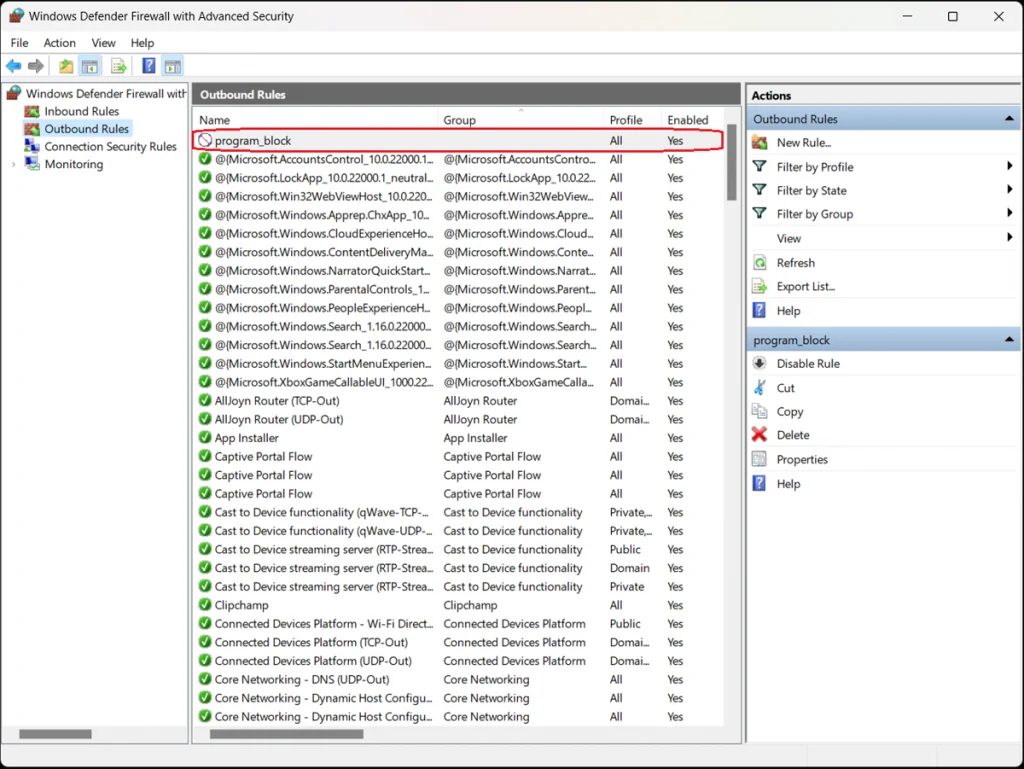
2. Select Inbound Rules or Outbound Rules
Choose whether you want to set an inbound rule allowing access to your computer for an external application or program, or an outbound rule allowing an application or program installed on your computer external access through the firewall.
The program-blocking process is similar for both types of rules—for this example, we’ll choose Outbound Rules to block a program in the firewall.
Select the appropriate option from the left sidebar of the Windows Defender Firewall with Advanced Security screen. A list of outbound rules appears detailing their names, groups, profiles, and status (enabled/disabled).
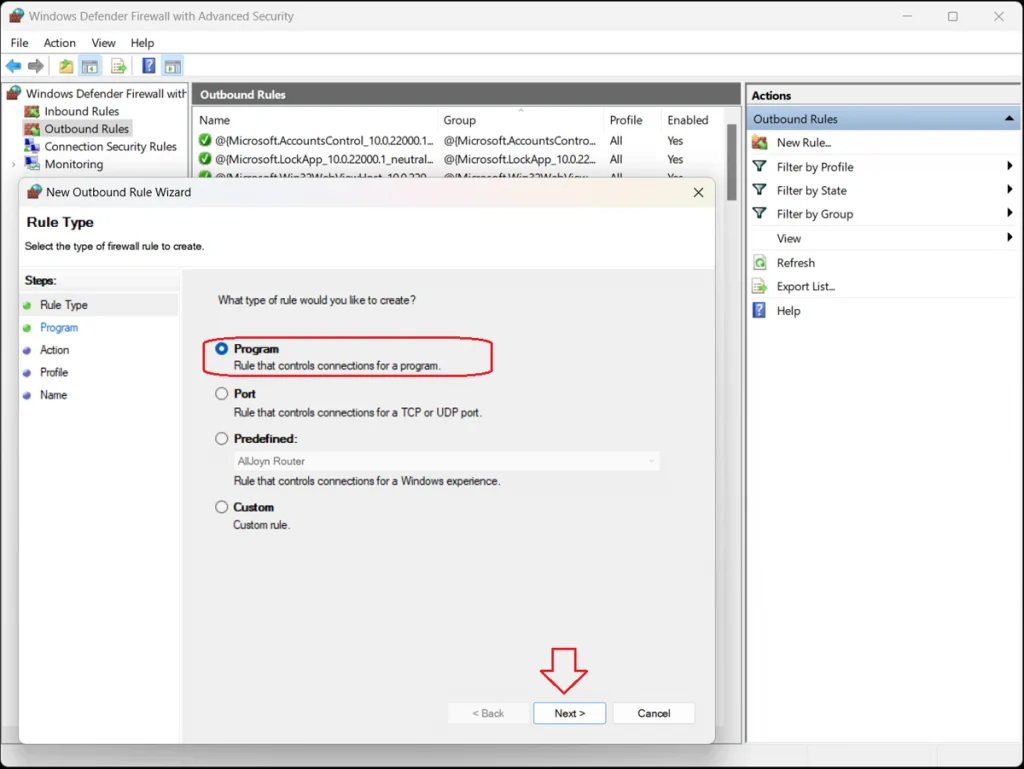
3. Create a New Rule
In the sidebar to the right of the list of existing outbound rules, click the “New Rule…” option. The New Outbound Rule Wizard opens, presenting four options for type of outbound rule:
Program
Port
Predefined
Custom
4. Select “Program”
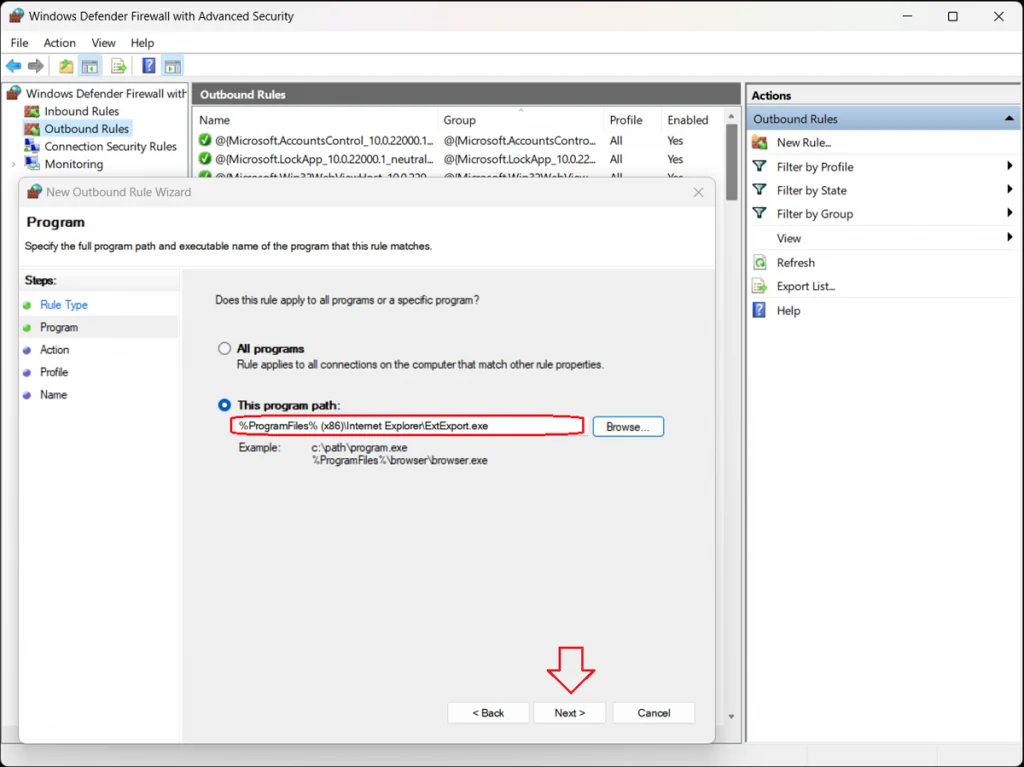
Select Program and click the “Next>” button. The Program dialog box opens to ask whether you want this rule to apply to all programs or just one specific program.
To block a specific program, select the “This program path” option and click the “Browse…” button to open the program folder.
Locate and select the executable file (.exe) for the program you want to block.
Click the “Next>” button.
5. Block the Connection
The Action window of the New Outbound Rule Wizard opens, presenting three options:
Allow the connection. This includes connections that are protected with IPsec and well as those that are not.
Allow the connection if it is secure. This includes only connections that have been authenticated by using IPsec. Connections will be secured using the settings in IPsec properties and rules in the Connection Security Rule node.
Block the connection. This blocks the connection.
Select “Block the connection” and click the “Next>” button.
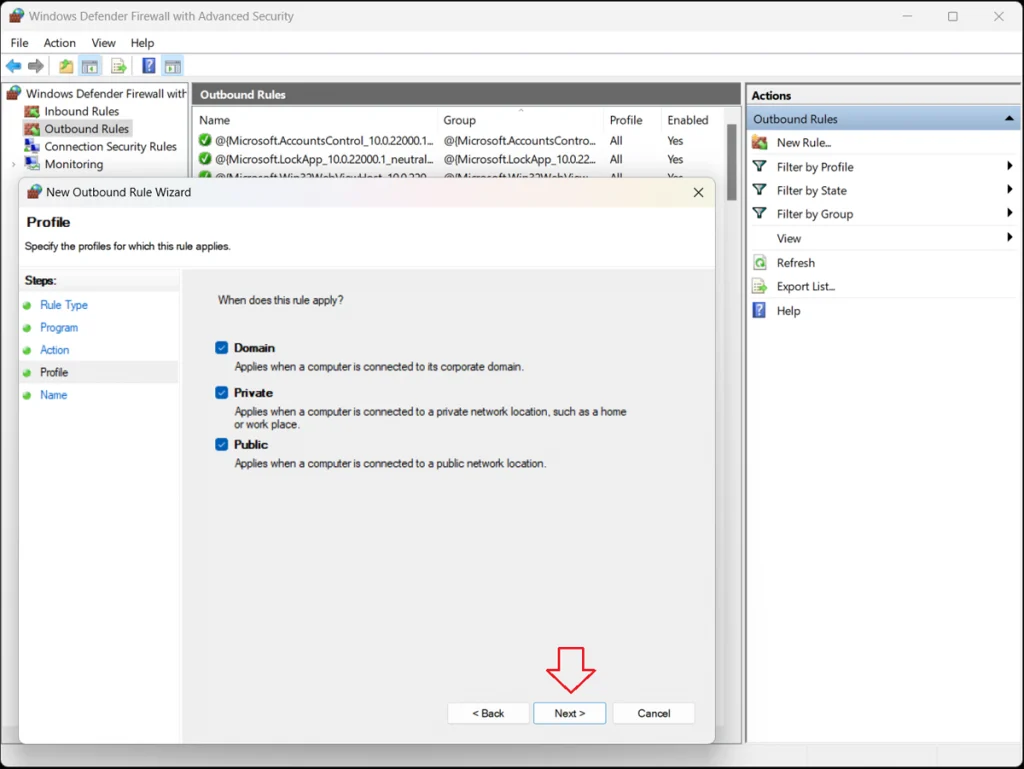
6. Specify the Profiles
The Profile window of the New Outbound Rule Wizard opens, presenting three options:
Domain–Applies when a computer is connected to its corporate domain.
Private–Applies when a computer is connected to a private network location, such as a home or workplace.
Public–Applies when a computer is connected to a public network location.
Specify when the rule will apply and click the “Next>” button.
7. Assign the Rule a Name and Description
The Name window of the New Outbound Rule Wizard opens. In the empty fields, assign a name and description for the rule. Click the “Finish” button.
The Windows Defender Firewall with Advanced Security box lists all the existing outbound rules. Confirm that your new rule is included in the list. The program is now blocked; to unblock it, simply select and delete the rule.
You can unblock other programs the same way—to find them, sort the list by name, profile, state (enabled/disabled), or group and click Disable Rule in the right sidebar. You can also perform cut, copy, and delete rules or view their properties.
Bandwidth, Resolution, Refresh Rate, and Use Cases
As of 2025, both HDMI and DisplayPort have evolved dramatically. Whether you’re building a sovereign workstation, upgrading a gaming rig, or designing immersive signage, understanding these standards is essential.
📊 Specification Table
Standard
Bandwidth
Max Resolution
Max Refresh Rate
Cable Type
HDMI 2.2
96 Gbps
16K
4K @ 480Hz<br>8K @ 240Hz<br>10K @ 120Hz
Ultra96 certified
DisplayPort 2.1b
80 Gbps (DP80LL)
16K
10K @ 120Hz HDR<br>8K @ 240Hz
DP80LL low-loss
🆕 What’s New in HDMI 2.2
Bandwidth doubled from HDMI 2.1’s 48 Gbps to 96 Gbps
Supports 4K @ 480Hz, 8K @ 240Hz, and 10K @ 120Hz
Introduces Latency Indication Protocol (LIP) for better audio-video sync
Requires Ultra96 cables to unlock full spec
Ideal for AR/VR, medical imaging, light field displays, and digital signage
Enable Drag and Drop using Windows Registry Editor
SPECIAL NOTE* After This registry entry some times start menu will not work with latest build’s of Windows 11 like mine was 21H2 (OS Build 2200.739), if that happened to you just delete the added registry and and reboot.
You can enable and adjust the drag and drop sensitivity settings in Windows by creating a system restore point in the Windows Registry Editor. For example, to enable drag and drop in Windows 11 using the Windows Registry Editor, follow the given steps.
Press Windows + R on your keyboard
This will open the Run command box.
In the command box, type in the following command “regedit” and press OK.
The Windows Registry Editor is now visible on your screen
Now, navigate to the below-mentioned path
HKEY_LOCAL_MACHINE\SOFTWARE\Microsoft\Windows\CurrentVersion\Shell \Update\Packages

6 Now, right-click on the blank white space on the right navigation pane
7 Here, choose New > DWORD (32-bit) Value.
8 This will create a new value in the registry editor
9 Right-click on this newly created value file
10 Choose Rename
11 Rename this value file as follows UndockingDisabled
12 Right-click on UndockingDisabled
13 Select Modify
14 Now, change the value to 0 to 1
15 Click OK to save the settings

Now restart your computer. After restart, you will notice the taskbar will appear same as like in Windows 10 and the drag and drop functionality feature will now be restored on your computer.
How to copy members from security group to distribution groups or the other way around? This is how to copy members from one AD group to another with PowerShell.
In our example, we like to copy the users from the AD group Group-A to another AD group Group-B.
To copy members from one AD group to another will work for all group scopes and group types:
Group scope: Domain local / Global / Universal
Group type: Security / Distribution
Copy members from one AD group to another with PowerShell
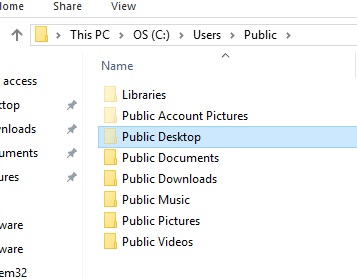
If you want to copy some shortcuts or files to all users desktop in server 2016/2019. specially if your configuring a remote desktop session host server and you want to copy company applications short cuts to all users desktop.like in previous versions c:\users\all users\desktop is not available on these server editions.
in Server 2019 and 2016 its available in
C:\Users\Public\Desktop


If you cannot see the desktop Folder tick show hidden items from windows explorer ribbon
Also
To find out the directory for your system run Following command in a PowerShell prompt:
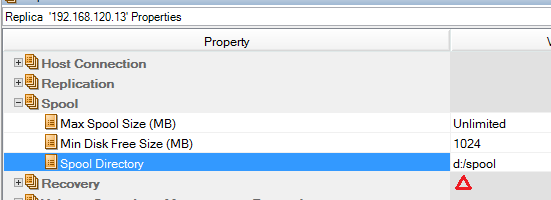
ER00105 976683 Error 192.168.120.13 2/10/2022 12:24:30 PM Unable to send file D:/Program Files/CA/ARCserve RHA/Engine/tmp/spool/1222255101_2/bl_sync_1196825767.rqv to 192.168.128.20 (file to send unable to be open)
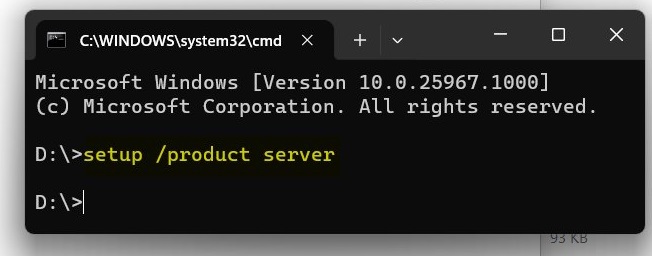
HUGE GROUND BREAKING DISCOVERY! To ALL users that don’t meet the artificial requirements for Windows 11, I GOT SOME GREAT NEWS TO SHARE! When adding “/product server” switch to setup.exe in the Windows 11 setup directory, it BYPASSES the Windows 11 hardware requirement checks.
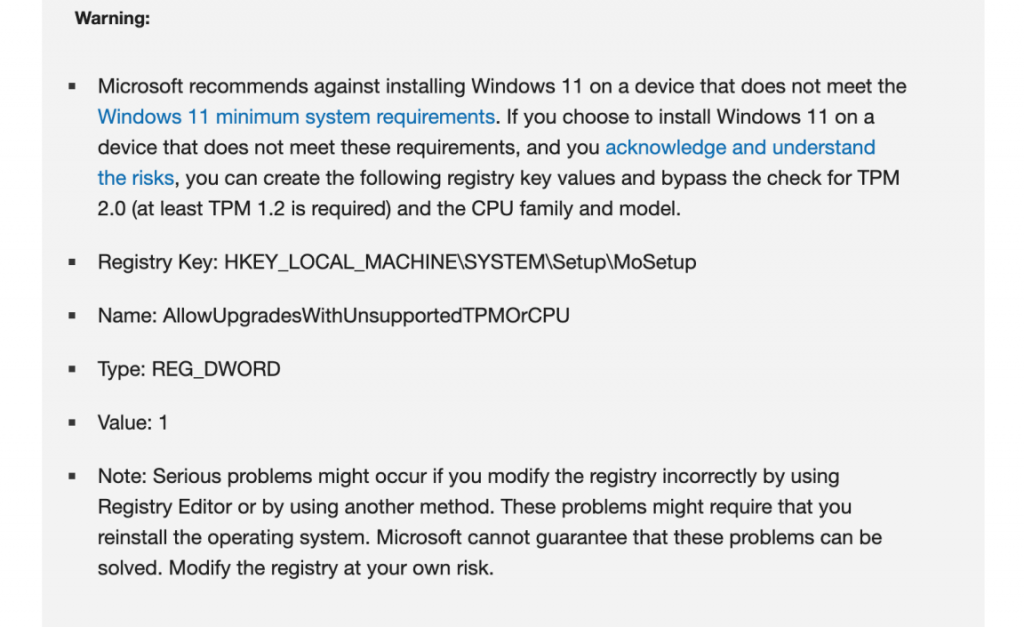
Method: Modify Registry
This method involves simply editing Windows Registry during the installation process of the new operating system. On unsupported devices, if you try to install the new OS, a message will appear on your screen stating that the computer isn’t compatible.
At that screen, you need to press Shift+F10 to open Command Prompt window and modify the registry. In Command Prompt, you need to run regedit.exe and create a new key “LabConfig” under HKEY_LOCAL_MACHINE\SYSTEM\Setup. In the “LabConfig” key, create two new entries:
BypassTPMCheck=dword:00000001
BypassSecureBootCheck=dword:00000001
Save the changes and compatibility errors will disappear.
Update | 2021 – October – 06
The fix itself is fairly straightforward too. Simply hit Win+r and type regedit to bring up the registry editor. Make your way to HKEY_LOCAL_MACHINE\SYSTEM\Setup\MoSetup and then right-click the main panel and create a new DWORD (32-bit) Value with a name of AllowUpgradesWithUnsupportedTPMOrCPU and set its value to 1.