Slow Outlook 2016 Autodiscover with Office 365 or Internal Exchange Server

In case you run into slow account setup with Outlook 2016, which can take up to 10 mins or more. To workaround this issue, you may use the following Registry settings to force Outlook to bypass the root domain discovery and redirect to the autodiscover CNAME or A record to resolve the address for autodiscover settings.

For Outlook 2016:

Windows Registry Editor Version 5.00
[HKEY_CURRENT_USER\SOFTWARE\Microsoft\Office\16.0\Outlook\AutoDiscover]
“ExcludeHttpsRootDomain”=dword:00000001

Note: For Office PC that has joined the Microsoft Active Directory, there is no need to amend the registry. This setting will be applied via the group policy when you login the system. and make sure Exchange Internal auto discovery DNS Entries are already created to auto discover internal Exchange Server


More Information Available at http://www.mistercloudtech.com/2015/12/08/how-to-resolve-slow-office-2016-autodiscover-with-office-365/

PowerShell to FIX: the trust relationship between this workstation and the primary domain failed

Open PowerShell as administrator. Run this command sequence:
$credential = Get-Credential  (enter domain admin account when prompted)

Reset-ComputerMachinePassword -Server ClosestDomainControllerNameHere


Create a USB Drive for Windows Server 2016 Installation For UEFI Systems


The at least a 8GB USB drive has to be formatted in FAT32
The USB needs to be GPT and not MBR
Copy all files from the ISO to the USB drive

This is it, and here is how you do it:

First plugin your USB drive to your computer. The USB drive should be bigger than 6GB.

Open a CMD prompt or PowerShell using the Run as Administrator option and open diskpart. Now you can do list all this by using

list disk

Select the USB disk, in my case this was disk 1

select disk 1 (Be careful Select the correct Disk)

Clean the disk. Be careful this will remove all files and partitions on the USB media.

clean

Now convert it to GPT

convert gpt

Create a new primary partition. But make sure the partition is not greater than 16GB otherwise it can be formatted with FAT32.

create partition primary

# If your USB drive is bigger than 16GB use the following command

create partition primary size=16000

Format the partition with FAT32

format fs=FAT32 quick

Assign a drive letter to the volume

assign letter=k

now you can exit the diskpart and copy all files from the Windows or Windows Server to the USB drive and boot it. This works with Windows 8, Windows 8.1, Windows 10, Windows Server 2012, Windows Server 2012 R2 and Windows Server 2016 or even Hyper-V Server in the same editions.

Important:

If Install.wim is larger than 4GB, you cannot copy the file to the drive, because of theFAT32 based partition limitation. The solutions for this is to split the wim file into smaller files.

split wim file using dism (you may have to change the drive letters):
dism /Split-Image /ImageFile:e:\sources\install.wim /SWMFile:k:\sources\install.swm /FileSize:4096

Your Account has been disabled after reconnect a Disconnected Mailbox in Exchange Server 2010


Thanks to Original Post at https://linkdottech.wordpress.com/2014/12/06/your-account-has-been-disabled-after-reconnect-a-disconnected-mailbox-in-exchange-server-2010/


Dears when an Exchange 2010 mailbox has been disabled it becomes a disconnected mailbox, may be you need to restore this mailbox and suddenly after restored you get the above message when you try to login through OWA “your account has been disabled”  but the mailbox already enable and to be sure you can list the disconnected mailboxes run the following PowerShell command

Get-MailboxStatistics -Database DBName | Where { $_.DisconnectReason -eq “Disabled” } | Format-List LegacyDN, DisplayName, MailboxGUID, DisconnectReason

Surprise!! Now the mailbox is simply disabledSad smile You have been guided to enable this mailbox by the following PowerShell command,

Enable-Mailbox -Identity UserName

Another Surprise !! you got the following Error message “This task does not support recipients of this type.” Sad smile And after Check the user type by the following PowerShell command

Get-mailbox UserName|Fl Recipient* you got the following results that mean no problem with the user type.

RecipientLimits            : unlimited
RecipientType              : UserMailbox
RecipientTypeDetails : UserMailbox

In this case if you try to export the user mailbox you will get the following error message: “Couldn’t connect to the source mailbox”

5-6-2014 9-53-48 AM

And this message let you make check on the MAPI if enable or not for this user by the following PowerShell command:

Get-CASMailbox -Identity UserName

5-6-2014 9-51-22 AM


And you found the MAPI enabled True that mean no problem by MAPI as the above figure.


At the End you need to say Haaaaaaa7Smile And solution is the following PowerShell Command after run it everything will be working normally SmileSmileSmile

Get-mailboxdatabase | Clean-mailboxdatabase


Enabling Disk Performance Counters in Windows Server 2016 Task Manager


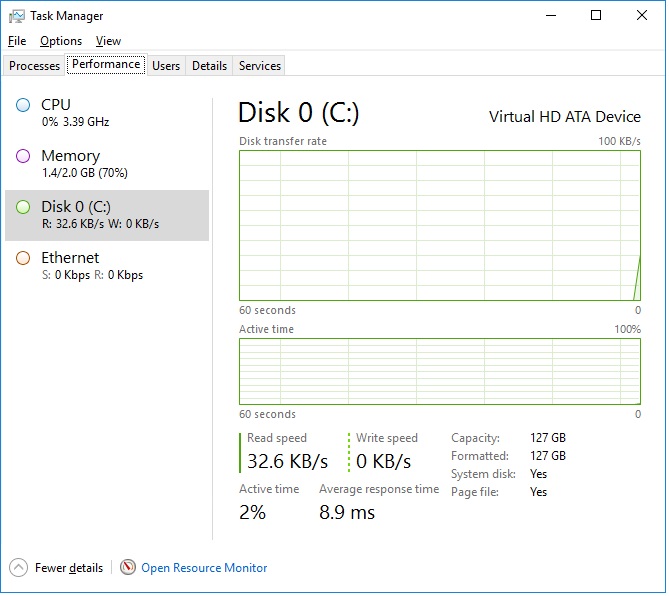
In Windows Server 2012 R2 / 2016, disk performance counters were disabled by default because of a noted significant performance impact in collecting Disk metrics on a Server. This is due to the overhead Task Manager can cause when querying each Disk IO for each process/thread on the individual disk. Interestingly enough disk resource values are visible in the Processes view of Task Manager found on Windows 8.1.  Not to fret though, as enabling disk performance counters in Windows Server 2012 R2 / 2016  is far from being a daunting task.

Step 1: Enabling Disk Performance Counters

  1. Ensure Task Manager is closed.
  2. Launch the Command Prompt using the “Run as Administrator” option.
  3. Enter the following at the Command Prompt:diskperf -Y
  4.  Hit Enter.
  5. Close the Command Prompt.
  6. Re-open the Task Manager.

After running the diskperf command, the ability to view Disk performance statistics on the performance tab should now be visible.


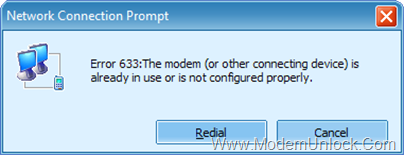
Error 633: The modem is already in use or not configured properly – Windows 10

Error-633_thumb

Question

Issue: How to Fix Modem Error 633 after Windows 10 Creators Update?

I’ve installed Windows 10 Creators Update yesterday. Apparently it broke my modem because it gives me the error message “Error 633: The modem is already in use or not configured properly.” It seems that the VPN connection cannot be established, but I actually don’t know how to fix that. Help, please!

Solved Answer

“Error 633: The modem is already in use or not configured properly” is the Internet connection issue, which has occurred for hundred of Windows 10 users after the installation of Creators Update. Microsoft has already acknowledged this issue and is working hard to release the solution the near future. However, before the future update patching the modem Error 633 is released, Windows 10 users have to perform the fixes manually.

The “Error 633: The modem is already in use or not configured properly” is not bound to one specific device, so any model and PC model can be affected. The error message explicitly indicates the fact that the modem is malfunctioning due to the faulty configuration. However, Error 633 may also occur due to the multiple Internet connections set up on one device or communication port exploited by another application. Luckily, Microsoft officially revealed the instructions that people should use before the patch for “Error 633: The modem is already in use or not configured properly” is released.

Run Registry Editor

  • Press Windows key, type regedit, and press Enter.
  • Navigate to HKEY_LOCAL_MACHINE\SYSTEM\CurrentControlSet\Services\RasMan directory.
  • Find RequiredPrivileges key and double-click it.
  • Add the SeLoadDriverPrivilege at the end of the list of keys and click OK.
  • If a warning message shows up, click OK to proceed.
  • Finally, reboot the system.

This worked for me 🙂  Credits to : – UGetFix

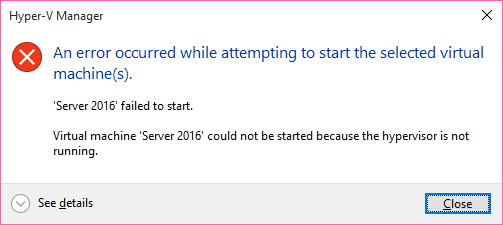
Windows 10 – Cannot start Virtual machine because the hypervisor is not running

This post is just to fix if you cannot start a VM what was working previously perfect and suddenly it started to give Error

“Virtual machine [VM Name] could not be started because the hypervisor is not running”

2015-11-18-2

I suggested running the following from an elevated command prompt: (Please run Command prompt as administrator)

bcdedit /set hypervisorlaunchtype auto

Shutdown the Computer , Unplug the Power code and wait for a while and switch on the computer.

Now try to start the VM

Additional info –

WHAT is SLAT?

Second Level Address Translation is a technology introduced in both Intel and AMD flavors of processors. Both companies call their version of the technology different names, Intel’s version is called EPT(Extended Page Tables) and AMD calls theirs RVI (Rapid Virtualization Indexing). Intel introduced Extended Page Tables in its processors that were built on the Nehalem architecture, while AMD only introduced RVI in their third generation of Opteron processors codenamed Barcelona. Hyper-V uses this to perform more VM memory management functions and reduce the overhead of translating guest physical addresses to real physical addresses. By doing this, Hypervisor CPU time is significantly reduced, and more memory is saved for each VM.

How Do I Know If I Have SLAT?

Download Coreinfo from Microsoft Technet

[Mirror Download]

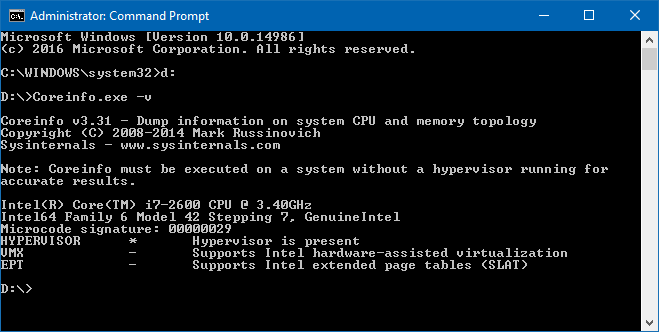
Run this command from a elevated command prompt

coreinfo.exe -v

if all ok it should be like this

2017-02-28


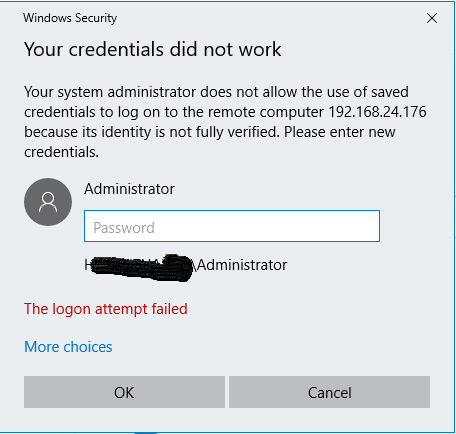
Your system administrator does not allow the use of saved credentials to log on to the remote computer

M2

If you’re a system administrator working with remote desktop a lot within a somewhat restrictive domain environment, you may be frustrated by the following message:

There are a few tutorials on the net that say to remove this you just need to go into Group Policy and disable ‘Do not allow passwords to be saved’, unfortunately that isn’t what this error message is related to. Instead, we need to change another part of Group Policy.

Hit Win+R to bring up the ‘Run’ dialog, enter ‘gpedit.msc’ and hit OK.

Run dialog with gpedit.msc

Go down the tree into Computer Configuration -> Administrative Templates -> System -> Credentials Delegation.

Group Policy -> Credentials Delegation

Now, you need to allow Allow delegating saved credentials and Allow delegating saved credentials with NTLM-only server authentication. For each, you’ll also need to allow a set list of servers that are explicitely allowed to save credentials, you can enter IP Addresses, Server hostnames, AD Domain name wildcards, or just any old wildcard. Since I wanted to be able to store credentials for everything, I just used a plain wildcard, and you can too!

Allow Delegating Saved Credentials with Wildcard

There we go, you’ll now automatically connect to your servers!

( source – http://rudiv.se/Article/fix-for-system-administrator-not-allow-saved-credentials-rdp )

Cannot open this item. The text formatting command is not available. It may not be installed correctly. Install Microsoft Office Outlook again

outlook1000

Symptoms

When you try to open an email message in Microsoft Outlook 2013, Outlook 2010, or Outlook 2007, you receive the following error message:

Cannot open this item. The text formatting command is not available. It may not be installed correctly. Install Microsoft Outlook again.
Microsoft Solution for this avilable

Some say that computer problems happen at the worst times. I’m not sure that is true, but I won’t argue. Without warning, my Outlook email stopped working last week. I could receive email, but I couldn’t open any items. Instead, I saw an error message that read “Cannot open this item. The text formatting command is not available. It may not be installed correctly. Install Microsoft Office Outlook again.” Fortunately, my main email address runs in parallel so I wasn’t totally hosed.

For most of my Outlook email problems, I can work my way to a solution. This one had me stumped although I had some functionality running Outlook in safe mode.

To start Microsoft Outlook in safe mode,

  1. For Windows 7, click Start. For Windows 8 or Windows 8.1, press your Windows key and then the X key, then choose Run from the popup menu.
  2. Type Outlook /safe in the Run dialog box.

Prior to calling Microsoft Support, I did a query on the error message to see what solutions had been suggested. While I don’t know the cause of the problem, I found 3 suggestions that might solve the problem.

(For me Suggestion 3 worked)

Suggestion 1: Reinstall Microsoft Outlook.

If the developer offers a solution on an error message, that’s where I start. Let’s face it, they have the inside advantage. In my case, I recently installed some Windows patch files and thought they may have contributed to the problem.

Suggestion 2: Create a New Outlook Profile

From what I read, this procedure fixed the problem for many folks. This was the first thing the Microsoft technician suggested.  SlipStick has a good tutorial on this.

Like the first suggestion, this one didn’t fully resolve my problem. It appeared to work and then the error message reappeared. Again, I had to call Microsoft.

Suggestion 3: Close Outlook and Rename 4 .DAT files

The third time was a charm as the saying goes. This tech rep offered a different solution from his peers. In my case, this solution worked.

There were four .dat files that were renamed so the originals were still around if needed.

  • outcmd.dat
  • frmcache.dat
  • views.dat
  • extend.dat

When Outlook restarted, it created new versions of those files.

As a result of this fix, I did lose some custom view and toolbar settings, but I think it was worth the cost. It’s was much easier for me to recreate those settings than to be without my email. And yes, I’m still catching up on email inquiries if you sent me something.

Update Windows Defender even when Automatic Windows Updates is disabled in Windows 8/10

Windows Defender will not update its definitions, if Windows Updates is not set to Install updates automatically in Windows 10/8. If for some reason you have changed your settings and preferred to set any of the other three updating’s options, viz. Download updates but let me choose whether to install them, Check for updates but let me choose whether to download and install them or Never check for updates, your Windows Defender will not have the latest definitions, till such a time that you update them manually. This is because, Windows Defender and Windows Update in Windows 8 are  both dependent on the Windows Updates services.

This is not a recommended scenario, as one’s security software should be updated as soon as new definitions are available for download.

Update Windows Defender when Automatic Windows Updates is disabled

But you can set it so that Windows Defender will check for, download and install updates as soon as they are available, even if you have disabled Automatic Windows Updates.

To do so, open the Task Scheduler. You will find it under Administrative Tools in your Control Panel.

task-scheduler-1

In the right pane, click on Create Basic Task. The Create Basic Task Wizard will open. Give the task a name and description and click on Next.

ts-2

Select the frequency, viz Daily.

ts-3

Set the Time at which the updating task should run.

ts-4

Next select Start a program.

ts-5

Advt

^

In the Program box, type “C:\Program Files\Windows Defender\MpCmdRun.exe”. MpCmdRun.exe is the executable file of Windows Defender that helps in carrying out common tasks like scanning, scheduling, updating, etc.

In the Add arguments box, type -SignatureUpdate. This is one of the available command line arguments for Windows Defender.

ts-6

Having done this, review the details and click on Finish.

ts-7

You will now be able to see the task in the Task Scheduler Library.

Now your Windows Defender will update itself, regularly, every day at the set time, although you may have disabled Automatic Windows Updates.

If you want Windows Defender to check for signature updates more than once every day, you will have to additionally do the following:

Open its Properties box and click on Triggers tab. Select the task and click on Edit.

def-props

Here check the Repeat task every and from the drop-down menu, select 1 hour. This will check for updates every hour. If you wish to check every 6 hours, simply change the figure from 1 to 6; it works!

edit-trigger

Click OK/Apply and Exit.

When the task is run, a black CMD window will open momentarily and close down.

If you wish to run a silent update, instead of: C:\Program Files\Windows Defender\MpCmdRun.exe –SignatureUpdate you may use: C:\Program Files\Windows Defender\MSASCui.exe -Update.

Let us know how this works for you.

(Credits to http://www.thewindowsclub.com/update-windows-defender-automatic-windows-updates-disabled )

Powered by WordPress and Bootstrap4